This was an old article on my website, which I thought might be good to resurrect in case people might still find it useful.
The Form's Key events can be used to determine which key on the keyboard was pressed so that certain user actions can be intercepted. Access provides some built-in KeyCode Constants that can be used for this situation. However, I couldn't find a complete list of all the possible Key Code Values anywhere, so I decided to create this page.
Below is an image of a typical keyboard layout. Hovering your mouse over each key will display the corresponding Key Code Value.
Enjoy!
Thursday, December 27, 2018
Tuesday, November 6, 2018
Create a Parameter Query to accept multiple values
Parameter queries are a quick way to create dynamic queries where the result changes depending on user input. If you are not familiar with parameter queries, you can review my article on Parameter Query Basics.
The following SQL statement is an example of a parameter query.
The above query will prompt the user to enter a department and the result will show all the employees working for that department. So, users are free to enter any department they are interested to see, each time they run the query. But what if the user wants to see all the employees for more than one department?
Typically, in a non-parameterized query, the SQL statement might look something like this.
In the above example, we switched to using the foreign key (DeptID), which would be a more likely scenario anyway and also to make demonstrating the technique being presented a bit simpler to explain. Also, please note the In() clause in the above example is a shorthand for the following criteria (meaning, it's functionally the same).
So, our goal is to prompt the user to enter multiple DeptID using a parameter. One might be tempted to try the following as a query criteria.
and expecting the user to simply enter 1,3,5 when prompted. Unfortunately, this seemingly straightforward approach will not work because Access will interpret the entire input as a String or Text. So, entering 1,3,5 does not mean 1 or 3 or 5; but rather, a string value of "1,3,5" - and we know there won't be any DeptID of "1,3,5" because DeptID is a numeric field. So, the query will result in an empty set because the intended criteria fails. Of course, the obvious solution is to use the following criteria.
The above approach will work, but the user will be prompted to enter a single DeptID three times, which would be fine but what if the user wants to know more (or less) than three DeptID? As you can see, this approach is not very flexible.
Instead of using the above approach, we could try either of the following approaches.
or
When the user runs the query and gets the prompt, we are expecting the user to enter something like 1;3;5, which in our criteria will be converted into ;1;3;5; (I prefer to use semicolons but using commas would work the same way).
The first approach uses the InStr() function to search the current record's DeptID, encapsulated within a pair of semicolons, within the user's input string from the parameter prompt. If a match is found, the result of the function should be a number greater than zero (0), which would make the criteria evaluate as True and include the current record in the query's result set.
The second approach simply uses the Like operator with a pair of wildcard characters to accomplish the same effect as the first approach. I prefer to use the second approach because it is simpler and avoids a function call, but either approach will work as intended.
Unfortunately, this solution is not perfect. The first drawback is you'll have to "train" your users to enter their input using the exact format your query is expecting (e.g. 1,3,5 or 1;3;5 or 1 OR 3 OR 5). Otherwise, the query will not work if the user enters their input using any other format (e.g. user enters 1,3,5 but you expect 1;3;5). Adding the expected format in the parameter prompt, as in the example above, should help a little bit in reminding the user what format is expected.
The other drawback I would like to point out affects any parameter query, in general. As I mentioned in my article on Parameter Query Basics, there is really no way to validate the user's input when using a parameter query. Your query might be asking users to enter a DeptID in the parameter prompt but nothing will stop them from making a mistake and end up entering a DeptName instead. For this reason, it is considered "best practice" to use an unbound form to accept user input for your query parameters. Using a form will allow you more control over the user's input. You can easily validate their input when you use a form.
The last point I'll mention, if you do end up using parameters in your query, is to make sure you declare the data type for each parameter. This is more applicable when each parameter is a single value. To declare the parameter's data type, you can click on the Parameters button on the Design Ribbon to open the Query Parameters window.
To declare the parameter data types manually, you can add the PARAMETER clause at the beginning of your query's SQL statement. For example:
Please note, it is very important to end the PARAMETER clause with a semicolon, or you will get a syntax error. Also, the PARAMETER clause is typically required in Crosstab queries.
Parameter queries allow us to create semi-dynamic queries, which could help reduce the number of queries we need to create if all we need to change is the criteria condition of the query, based on user input. It is even possible to create a parameter query that accepts multiple values from the user. However, parameter queries have some limitations that it is highly recommended to use input forms whenever possible. Still, parameter queries are good as quick solutions for those times when the requirement is simple enough with very low chance of user input errors.
The following SQL statement is an example of a parameter query.
SELECT Title, FirstName, LastName, Position FROM Employees WHERE Department=[Enter Department]
The above query will prompt the user to enter a department and the result will show all the employees working for that department. So, users are free to enter any department they are interested to see, each time they run the query. But what if the user wants to see all the employees for more than one department?
Problem
Typically, in a non-parameterized query, the SQL statement might look something like this.
SELECT Department, Title, FirstName, LastName, Position FROM Employees INNER JOIN Detpartments ON Employees.DeptID=Departments.DeptID WHERE Employees.DeptID In(1,3,5)
In the above example, we switched to using the foreign key (DeptID), which would be a more likely scenario anyway and also to make demonstrating the technique being presented a bit simpler to explain. Also, please note the In() clause in the above example is a shorthand for the following criteria (meaning, it's functionally the same).
WHERE Employees.DeptID=1 OR Employees.DeptID=3 OR Employees.DeptID=5
So, our goal is to prompt the user to enter multiple DeptID using a parameter. One might be tempted to try the following as a query criteria.
WHERE DeptID In([Enter DeptID])
and expecting the user to simply enter 1,3,5 when prompted. Unfortunately, this seemingly straightforward approach will not work because Access will interpret the entire input as a String or Text. So, entering 1,3,5 does not mean 1 or 3 or 5; but rather, a string value of "1,3,5" - and we know there won't be any DeptID of "1,3,5" because DeptID is a numeric field. So, the query will result in an empty set because the intended criteria fails. Of course, the obvious solution is to use the following criteria.
WHERE DeptID=[Enter Dept1] OR DeptID=[Enter Dept2] OR DeptID=[Enter Dept3]
The above approach will work, but the user will be prompted to enter a single DeptID three times, which would be fine but what if the user wants to know more (or less) than three DeptID? As you can see, this approach is not very flexible.
Solution
Instead of using the above approach, we could try either of the following approaches.
WHERE InStr(";" & [Enter DeptID (separated by a semicolon ';')] & ";", ";" & DeptID & ";")>0
or
WHERE ";" & [Enter DeptID (separated by a semicolon ';')] & ";" Like "*;" & DeptID & ";*"
When the user runs the query and gets the prompt, we are expecting the user to enter something like 1;3;5, which in our criteria will be converted into ;1;3;5; (I prefer to use semicolons but using commas would work the same way).
The first approach uses the InStr() function to search the current record's DeptID, encapsulated within a pair of semicolons, within the user's input string from the parameter prompt. If a match is found, the result of the function should be a number greater than zero (0), which would make the criteria evaluate as True and include the current record in the query's result set.
The second approach simply uses the Like operator with a pair of wildcard characters to accomplish the same effect as the first approach. I prefer to use the second approach because it is simpler and avoids a function call, but either approach will work as intended.
Caveat
Unfortunately, this solution is not perfect. The first drawback is you'll have to "train" your users to enter their input using the exact format your query is expecting (e.g. 1,3,5 or 1;3;5 or 1 OR 3 OR 5). Otherwise, the query will not work if the user enters their input using any other format (e.g. user enters 1,3,5 but you expect 1;3;5). Adding the expected format in the parameter prompt, as in the example above, should help a little bit in reminding the user what format is expected.
The other drawback I would like to point out affects any parameter query, in general. As I mentioned in my article on Parameter Query Basics, there is really no way to validate the user's input when using a parameter query. Your query might be asking users to enter a DeptID in the parameter prompt but nothing will stop them from making a mistake and end up entering a DeptName instead. For this reason, it is considered "best practice" to use an unbound form to accept user input for your query parameters. Using a form will allow you more control over the user's input. You can easily validate their input when you use a form.
The last point I'll mention, if you do end up using parameters in your query, is to make sure you declare the data type for each parameter. This is more applicable when each parameter is a single value. To declare the parameter's data type, you can click on the Parameters button on the Design Ribbon to open the Query Parameters window.
To declare the parameter data types manually, you can add the PARAMETER clause at the beginning of your query's SQL statement. For example:
PARAMETERS [Enter DeptID] Long, [Enter Department] Text ( 255 ); SELECT ... FROM ... etc...
Please note, it is very important to end the PARAMETER clause with a semicolon, or you will get a syntax error. Also, the PARAMETER clause is typically required in Crosstab queries.
Conclusion
Parameter queries allow us to create semi-dynamic queries, which could help reduce the number of queries we need to create if all we need to change is the criteria condition of the query, based on user input. It is even possible to create a parameter query that accepts multiple values from the user. However, parameter queries have some limitations that it is highly recommended to use input forms whenever possible. Still, parameter queries are good as quick solutions for those times when the requirement is simple enough with very low chance of user input errors.
Tuesday, October 30, 2018
Happy Halloween to Gremlins and Zombies
About three years ago, I wrote this blog article on Combobox Gremlins. In perfect timing for the upcoming Halloween, I received a follow up comment from Colin Riddington trying to explain the reason for the issue I described in that article. He was so inspired by this phenomenon that he decided to post his own version of the same puzzle at Access World Forums.
So, in the spirit of Halloween we are about to celebrate tomorrow, I have decided to set the story straight, since I forgot to update the original blog with the solution to the puzzle. First, I must apologize to Philipp Stiefel, who helped me figure it out back then, because when I migrated my blog site to a new web host, his comment did not make it to the new site.
Philipp suggested the original table had a lookup field at one point but was then removed. However, the Row Source property for the field in the table still contains the Value List used by the original designer (it was an inherited database, I did not make it). If you download my original demo and execute the following code in the Immediate Window, you will see the Value List.
At the time, Philipp's explanation made sense to me and I just left it at that. It wasn't until Colin's follow up comment did I finally decide to find out the main reason why this is happening. At this point, I was lucky enough to be able to ask one of the Microsoft Access engineers (Shane Groff) for an explanation on this subject and this is what he said:
-QUOTE-
Phil is right about the original gremlin, it is easy to reproduce:
1) Create a table with a text field
2) Set the Display Control property to 'Combo Box', then set Row Source Type to Value List, and Row Source to a;b;c or whatever list items you want
3) Now change Display Control back to Textbox
4) Save and close the table
5) Make a new form, add a ComboBox, bind the form to your table, and the combo to your gremlin field
6) Switch to form view
Result: Your combobox has values, even though the don't appear anywhere in the table or form properties.
Even if you now switch the Display Control in the table back to Combo Box and the Row Source Type to Value List, you won't see the values (although if you save at that point, I think we clear the property).
This value is stored as a property on the table column, and we don't clear it when you change the Display Control property, so it still get's inherited by the form Combo Box (unless you Inherit Value List to No).
-END QUOTE-
One other thing that Philipp told me (and reemphasized by Shane above) was setting the Inherit Value List property of the Combobox to No will remove the Gremlins (or Zombies) from the Form's Combobox; however, the Row Source property of the field in the table is still there (so, setting the property back to Yes will bring them back). To permanently remove the Row Source property from my Gremlins demo, the following code needs to be executed:
So, the above revelation seems to be one more reason to avoid using lookup fields at the table level. In fact, the owner of The Access Web is deciding to update the page on The Evils of Lookup Fields in Tables to include this information.
I hope this article helps explain what was going on with my Gremlins demo and Colin's Zombies puzzzle. I want to thank all who helped figure out this puzzle.
Happy Halloween to everyone!
So, in the spirit of Halloween we are about to celebrate tomorrow, I have decided to set the story straight, since I forgot to update the original blog with the solution to the puzzle. First, I must apologize to Philipp Stiefel, who helped me figure it out back then, because when I migrated my blog site to a new web host, his comment did not make it to the new site.
Philipp suggested the original table had a lookup field at one point but was then removed. However, the Row Source property for the field in the table still contains the Value List used by the original designer (it was an inherited database, I did not make it). If you download my original demo and execute the following code in the Immediate Window, you will see the Value List.
?CurrentDb.TableDefs("Searchtable").Fields("Appropiation").Properties("RowSource").Value
At the time, Philipp's explanation made sense to me and I just left it at that. It wasn't until Colin's follow up comment did I finally decide to find out the main reason why this is happening. At this point, I was lucky enough to be able to ask one of the Microsoft Access engineers (Shane Groff) for an explanation on this subject and this is what he said:
-QUOTE-
Phil is right about the original gremlin, it is easy to reproduce:
1) Create a table with a text field
2) Set the Display Control property to 'Combo Box', then set Row Source Type to Value List, and Row Source to a;b;c or whatever list items you want
3) Now change Display Control back to Textbox
4) Save and close the table
5) Make a new form, add a ComboBox, bind the form to your table, and the combo to your gremlin field
6) Switch to form view
Result: Your combobox has values, even though the don't appear anywhere in the table or form properties.
Even if you now switch the Display Control in the table back to Combo Box and the Row Source Type to Value List, you won't see the values (although if you save at that point, I think we clear the property).
This value is stored as a property on the table column, and we don't clear it when you change the Display Control property, so it still get's inherited by the form Combo Box (unless you Inherit Value List to No).
-END QUOTE-
One other thing that Philipp told me (and reemphasized by Shane above) was setting the Inherit Value List property of the Combobox to No will remove the Gremlins (or Zombies) from the Form's Combobox; however, the Row Source property of the field in the table is still there (so, setting the property back to Yes will bring them back). To permanently remove the Row Source property from my Gremlins demo, the following code needs to be executed:
CurrentDb.TableDefs("Searchtable").Fields(" Appropiation").Properties. Delete ("RowSource")
So, the above revelation seems to be one more reason to avoid using lookup fields at the table level. In fact, the owner of The Access Web is deciding to update the page on The Evils of Lookup Fields in Tables to include this information.
I hope this article helps explain what was going on with my Gremlins demo and Colin's Zombies puzzzle. I want to thank all who helped figure out this puzzle.
Happy Halloween to everyone!
Friday, September 28, 2018
Copy Folder Structure
Hello there! First, I must apologize for the title of this article. I chose it because I think most Internet searches use a phrase similar to it, and I wanted to make sure people get to see and consider this information in their projects.
So, I am not really going to discuss the steps on how to duplicate a folder structure using VBA because there are already plenty of articles available on how to do it. Instead, I am just going to share a little bit of information I discovered yesterday as I was working on a utility for backing up my files from one drive to another.
In this utility, I needed a way to keep the folder structure the same on both the source and the target drives, so I can automatically compare the files between them and make sure I have the latest copy in the backup location. Listing the files and comparing them was easy enough to do. It was when I have a new source file to copy to the backup location where I ran into the issue of having to create a folder or subfolder on the other drive. (I might have a new source file located in a folder a few levels deep because I don't necessarily do a backup at a regular interval.)
We all know we can use the VBA MkDiR() function to create a folder or the CreateFolder method of the File System Object (FSO) to do the same. However, both of these methods suffer from the same issue; which is, they can only create a folder one level deep at a time. For example, using MkDir("C:\MyNewFolder") will create a folder called "MyNewFolder" under the root folder of the C: drive. Issuing the following command: MkDir("C:\MyOtherFolder\MySubFolder") will get a runtime error "76: Path not found" if C:\MyOtherFolder does not yet exist.
As a result, most articles on copying a folder structure use a recursive approach where the procedure walks the directory tree, one level at a time, creating each branch on its way to the end. So, in the above example, a recursive function might first check if C:\MyOtherFolder exists and creates it if necessary. Then, it will go down and check for the existence of the MySubFolder folder and then create it as needed. Both the VBA and FSO methods can be used in this recursive approach. If you want to see an example of a recursive approach for copying a folder structure, please let me know in the comments below, and I will post some links to a few articles showing how to do it (or I might post an example code).
So, back to the topic I wanted to share... Although there is nothing wrong with using a recursive approach to create a folder structure (I like using recursion, myself, on some of my projects), I thought it would have been nice to create the entire tree (actually, just one branch, but all the way to the leaf) in one instance (as in, one command or one line of code). This is exactly what I discovered yesterday and wanted to share with all of you.
As it turns out, the DOS command MKDIR or MD can do exactly what I was looking for. So, if you open up a DOS prompt and enter the command MD C:\Folder1\Folder2\Folder3, DOS will create this folder structure, if it doesn't already exist. I thought, how cool was that? So, how can I use this in VBA? I'm glad you asked. Here's the one line command I ended up using in my backup utility.
where ws is a Shell object I created at the beginning of my procedure as follows:
and strTargetFolder is the folder structure for the new file. For example, "C:\MyFiles\ProjectName\Phase1\StatusUpdates\"
So, although recursion is a perfectly valid approach for copying a folder structure, I was just happy to find out another way to do the same without recursion and wanted to share it with everyone, in case some of you might also find it interesting and decide to use this approach in your projects.
Of course, we can discuss the pros and cons of each approach, but that's what the comments section is for. So, please let me know your thoughts, and I will be happy to discuss them below.
As always, thank you for reading, and I hope some of you will find this article useful.
Cheers!
So, I am not really going to discuss the steps on how to duplicate a folder structure using VBA because there are already plenty of articles available on how to do it. Instead, I am just going to share a little bit of information I discovered yesterday as I was working on a utility for backing up my files from one drive to another.
In this utility, I needed a way to keep the folder structure the same on both the source and the target drives, so I can automatically compare the files between them and make sure I have the latest copy in the backup location. Listing the files and comparing them was easy enough to do. It was when I have a new source file to copy to the backup location where I ran into the issue of having to create a folder or subfolder on the other drive. (I might have a new source file located in a folder a few levels deep because I don't necessarily do a backup at a regular interval.)
We all know we can use the VBA MkDiR() function to create a folder or the CreateFolder method of the File System Object (FSO) to do the same. However, both of these methods suffer from the same issue; which is, they can only create a folder one level deep at a time. For example, using MkDir("C:\MyNewFolder") will create a folder called "MyNewFolder" under the root folder of the C: drive. Issuing the following command: MkDir("C:\MyOtherFolder\MySubFolder") will get a runtime error "76: Path not found" if C:\MyOtherFolder does not yet exist.
As a result, most articles on copying a folder structure use a recursive approach where the procedure walks the directory tree, one level at a time, creating each branch on its way to the end. So, in the above example, a recursive function might first check if C:\MyOtherFolder exists and creates it if necessary. Then, it will go down and check for the existence of the MySubFolder folder and then create it as needed. Both the VBA and FSO methods can be used in this recursive approach. If you want to see an example of a recursive approach for copying a folder structure, please let me know in the comments below, and I will post some links to a few articles showing how to do it (or I might post an example code).
So, back to the topic I wanted to share... Although there is nothing wrong with using a recursive approach to create a folder structure (I like using recursion, myself, on some of my projects), I thought it would have been nice to create the entire tree (actually, just one branch, but all the way to the leaf) in one instance (as in, one command or one line of code). This is exactly what I discovered yesterday and wanted to share with all of you.
As it turns out, the DOS command MKDIR or MD can do exactly what I was looking for. So, if you open up a DOS prompt and enter the command MD C:\Folder1\Folder2\Folder3, DOS will create this folder structure, if it doesn't already exist. I thought, how cool was that? So, how can I use this in VBA? I'm glad you asked. Here's the one line command I ended up using in my backup utility.
ws.Run "cmd /c mkdir """ & strTargetFolder & """"
where ws is a Shell object I created at the beginning of my procedure as follows:
Set ws = CreateObject("WScript.Shell")
and strTargetFolder is the folder structure for the new file. For example, "C:\MyFiles\ProjectName\Phase1\StatusUpdates\"
So, although recursion is a perfectly valid approach for copying a folder structure, I was just happy to find out another way to do the same without recursion and wanted to share it with everyone, in case some of you might also find it interesting and decide to use this approach in your projects.
Of course, we can discuss the pros and cons of each approach, but that's what the comments section is for. So, please let me know your thoughts, and I will be happy to discuss them below.
As always, thank you for reading, and I hope some of you will find this article useful.
Cheers!
Sunday, August 26, 2018
RegEx vs Character Loop
As is often the case with database management, we invariably have to clean up the data at some point. This demo was inspired by a thread discussion at UtterAccess where the original poster was looking for a way to remove unwanted characters from table records. (Here's the link to the UA thread, for additional information on the requirement.)
So, the requirement is easy enough, and as we all know in Access, there's always more than one way to reach a solution for any particular problem. That was also the case in this situation.
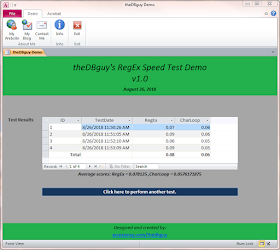
The two approaches I am comparing in this demo for removing unwanted characters from a string field in a table are (a) using regular expressions and (b) looping through the characters of the string. Both approaches will perform the job as required, but I was just curious if one particular approach would be faster than the other.
There may be other ways to test this theory other than the way I did it in this demo. For example, we could probably test the amount of time it would take to create a new table based on the result of cleaning up the data. As it stands right now, I just simply open and close a query containing a function call to each approach.
I encourage you to download the test file (it's only 526 KB) and try it out for yourself. Different configurations should give us different results. Please share your results if you do decide to give it a try and give us your conclusions as well.
I hope someone could find this little experiment somewhat useful in your projects or learning experience.
Thank you for reading...
UPDATE:
I wasn't sure if simply opening and closing the queries calling each function is enough to test for speed, so I added a couple more processes within each approach. You can download v1.1 using this link, if you want to see if it makes any difference in your outcomes. Cheers!
So, the requirement is easy enough, and as we all know in Access, there's always more than one way to reach a solution for any particular problem. That was also the case in this situation.
The two approaches I am comparing in this demo for removing unwanted characters from a string field in a table are (a) using regular expressions and (b) looping through the characters of the string. Both approaches will perform the job as required, but I was just curious if one particular approach would be faster than the other.
(click on the above image to download the demo file)
There may be other ways to test this theory other than the way I did it in this demo. For example, we could probably test the amount of time it would take to create a new table based on the result of cleaning up the data. As it stands right now, I just simply open and close a query containing a function call to each approach.
I encourage you to download the test file (it's only 526 KB) and try it out for yourself. Different configurations should give us different results. Please share your results if you do decide to give it a try and give us your conclusions as well.
I hope someone could find this little experiment somewhat useful in your projects or learning experience.
Thank you for reading...
UPDATE:
I wasn't sure if simply opening and closing the queries calling each function is enough to test for speed, so I added a couple more processes within each approach. You can download v1.1 using this link, if you want to see if it makes any difference in your outcomes. Cheers!
Monday, June 18, 2018
Retrieve Database (Extended) Properties
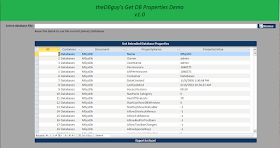
If you've ever wondered how to programmatically retrieve the information from the Summary tab when you click on "View and edit database properties" from the Info tab in Backstage View, then continue reading.
An example of the Summary tab information is shown in the image below.
If you try to loop through the CurrentDb.Properties collection, these particular properties are not present. For this reason, I consider them to be as "extended" database properties. To retrieve these extended properties, we can use a DAO object.
Here's an example code for specifically retrieving the extended properties found in the Summary tab.
The above technique can also be applied to retrieve some of the extended properties found in the other tabs (like Contents, for example). To see a demo file using this technique to examine the database properties for any Access database file, click the image below.
I hope you find this article useful. Please let me know if you find any bugs in the demo.
An example of the Summary tab information is shown in the image below.
If you try to loop through the CurrentDb.Properties collection, these particular properties are not present. For this reason, I consider them to be as "extended" database properties. To retrieve these extended properties, we can use a DAO object.
Here's an example code for specifically retrieving the extended properties found in the Summary tab.
Public Function GetSummaryInfo() As String '6/10/2018 'thedbguy@gmail.com Dim db As DAO.Database Dim dbContainer As DAO.Container Dim dbDocument As DAO.Document Dim dbProperty As DAO.Property Set db = CurrentDb() Set dbContainer = db.Containers("Databases") Set dbDocument = dbContainer("SummaryInfo") For Each dbProperty In dbDocument.Properties Debug.Print dbProperty.Name & ": " & dbProperty.Value Next 'cleanup Set dbDocument = Nothing Set dbContainer = Nothing Set db = Nothing End Function
The above technique can also be applied to retrieve some of the extended properties found in the other tabs (like Contents, for example). To see a demo file using this technique to examine the database properties for any Access database file, click the image below.
I hope you find this article useful. Please let me know if you find any bugs in the demo.
Wednesday, May 23, 2018
Backstage View
A while back, I posted a demo showing how to hide the Backstage View in Access 2010 (click here to see the original article). This particular technique allows developers to somewhat restrict users from making unwanted modifications to their database application.
Unbeknownst to me, Microsoft made some changes to the Ribbon schema in Access 2013 and 2016. Although the reference to the schema is the same for all versions since Access 2010, which is
it seems there were some changes made to the schema document for newer versions of Access. Fellow MVPs Daniel Pineault and Tom Wickerath brought this issue to my attention and provided a simple technique for identifying errors in the Ribbon XML at runtime. If you go to the Options settings, you can select Client Settings and put a check mark in the box for "Show add-in user interface errors" under the General heading (see image below).
When I did this, I started seeing the problems in my Ribbon XML (see image below for an example).
Just as a reminder, here's the Ribbon XML I used in Access 2010.
As a result of this revelation, I have decided to update my demo and also include a separate version of the demo for use with Access 2013 and 2016. The new Ribbon XML I ended up using for Access 2013 and 2016 looks like this:
As you can see from the above updated XML, I had to remove some of the old controls because they caused errors in 2013 and 2016. Hopefully, this article can help you update your Backstage Ribbon XML for use with Access 2013 and 2016. You can download the updated demos from my website.
Please note failing to update the Backstage Ribbon XML will not render your customized Access 2010 database application useless when opened using Access 2013 or 2016. All the incompatible controls will just be ignored by Access when rendering the Backstage View. Furthermore, if the user does not even have the Client Settings set to show user interface errors, then no warnings will show up at all to indicate there's any problem.
Unbeknownst to me, Microsoft made some changes to the Ribbon schema in Access 2013 and 2016. Although the reference to the schema is the same for all versions since Access 2010, which is
<customUI xmlns="http://schemas.microsoft.com/office/2009/07/customui">
it seems there were some changes made to the schema document for newer versions of Access. Fellow MVPs Daniel Pineault and Tom Wickerath brought this issue to my attention and provided a simple technique for identifying errors in the Ribbon XML at runtime. If you go to the Options settings, you can select Client Settings and put a check mark in the box for "Show add-in user interface errors" under the General heading (see image below).
When I did this, I started seeing the problems in my Ribbon XML (see image below for an example).
Just as a reminder, here's the Ribbon XML I used in Access 2010.
<backstage> <tab idMso ="TabInfo" visible="false"/> <tab idMso ="TabRecent" visible="false"/> <tab idMso ="TabNew" visible="false"/> <tab idMso ="TabPrint" visible="false"/> <tab idMso ="TabShare" visible="false"/> <tab idMso ="TabHelp" visible="false"/> <button idMso="FileSave" visible="false"/> <button idMso="SaveObjectAs" visible="false"/> <button idMso="FileSaveAsCurrentFileFormat" visible="false"/> <button idMso="FileOpen" visible="false"/> <button idMso="FileCloseDatabase" visible="false"/> <button idMso="ApplicationOptionsDialog" visible="false"/> <button idMso="FileExit" visible="true"/> </backstage>
As a result of this revelation, I have decided to update my demo and also include a separate version of the demo for use with Access 2013 and 2016. The new Ribbon XML I ended up using for Access 2013 and 2016 looks like this:
<backstage> <tab idMso ="TabInfo" visible="false"/> <tab idMso="TabOfficeStart" visible="false"/> <tab idMso ="TabRecent" visible="false"/> <tab idMso ="TabSave" visible="false"/> <tab idMso ="TabPrint" visible="false"/> <tab idMso ="TabHelp" visible="false"/> <tab idMso ="TabOfficeFeedback" visible="false"/> <button idMso="FileSave" visible="false"/> <button idMso="ApplicationOptionsDialog" visible="false"/> <button idMso="FileCloseDatabase" visible="false"/> <button id="exit" label="Exit" onAction="=RibbonAction('exit')"/> </backstage>
As you can see from the above updated XML, I had to remove some of the old controls because they caused errors in 2013 and 2016. Hopefully, this article can help you update your Backstage Ribbon XML for use with Access 2013 and 2016. You can download the updated demos from my website.
Please note failing to update the Backstage Ribbon XML will not render your customized Access 2010 database application useless when opened using Access 2013 or 2016. All the incompatible controls will just be ignored by Access when rendering the Backstage View. Furthermore, if the user does not even have the Client Settings set to show user interface errors, then no warnings will show up at all to indicate there's any problem.
Monday, March 26, 2018
List Files in a Folder and its Subfolders
While trying to answer a question in the MSDN Forums, I realized although there are already a lot of examples on how to list all the files in a folder or directory, I thought this was challenging enough for me to give it a try.
The original poster's request was to allow the user to search the folder for files matching a keyword and a list of specific file extensions. Also, the search should include all files inside subfolders.
Many of the examples I have seen use a loop to go through the folder structure and list all the files in them. Since I am a bit fascinated with recursion, I thought I would give it a try using a different approach. As a result of my attempt, I have created this demo.
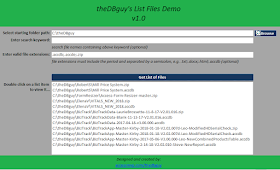
To use this demo, the user selects a starting folder path and enter an optional search keyword or list of file extensions to search. The search keyword is used to match the file names, while the list of file extensions will return only the files with matching file extensions.
The demo presents the result of the search using a Listbox. Double-clicking on an item in the Listbox will attempt to open the file for viewing. This version of the demo (v1.0) currently uses a Value List in the Row Source of the Listbox, which limits the number of files allowed to be displayed. The demo can be modified to store the file names in a table to allow the Listbox to display more items. I might do this in future versions of the demo.
In the meantime, I hope you find this demo useful, or at least, find the approach a little interesting.
As usual, I would appreciate any comments or feedback regarding this demo.
Cheers!
The original poster's request was to allow the user to search the folder for files matching a keyword and a list of specific file extensions. Also, the search should include all files inside subfolders.
Many of the examples I have seen use a loop to go through the folder structure and list all the files in them. Since I am a bit fascinated with recursion, I thought I would give it a try using a different approach. As a result of my attempt, I have created this demo.
Click on the above image to download the demo. |
The demo presents the result of the search using a Listbox. Double-clicking on an item in the Listbox will attempt to open the file for viewing. This version of the demo (v1.0) currently uses a Value List in the Row Source of the Listbox, which limits the number of files allowed to be displayed. The demo can be modified to store the file names in a table to allow the Listbox to display more items. I might do this in future versions of the demo.
In the meantime, I hope you find this demo useful, or at least, find the approach a little interesting.
As usual, I would appreciate any comments or feedback regarding this demo.
Cheers!