Thursday, February 25, 2016

Normalization

This month, I decided to go back to basics. I know there are already plenty of articles regarding this subject. But since I am about to give a lecture about this topic to a small group of people this week, I thought I might as well post it here, so I can use it as a quick reference in the future.

What is Normalization?

Normalization is the process of designing a database table structure that organizes the data to minimize data redundancy and facilitate data integrity. The main objective of "normalizing" the data is to isolate the information so modifications to the data can be performed in just one table and then propagate throughout the database by means of related foreign keys.
There are defined "rules" to follow when going through the normalization process. When a database is properly normalized, it is considered to be in "normal form." For example, a database complying with the first rule is said to be in "First Normal Form (1NF)." Although there are several levels or rules for normalizing a database, most developers will attempt to comply only up to the "Third Normal Form (3NF)." 3NF is considered to be the highest level necessary for most database applications in use today.

First Normal Form (1NF)

A database must comply with the following rules to be considered 1NF:
  1. Eliminate repeating groups in individual tables
  2. Create a separate table for each set of related data
  3. Identify each set of related data with a primary key

Example: The following table violates 1NF.


Second Normal Form (2NF)

A database must comply with the following rules to be considered 2NF:
  1. All the rules for 1NF
  2. Create separate tables for sets of values that apply to multiple records (duplicates)
  3. Relate these tables with a foreign key

Example: The following table is in 1NF but violates 2NF:


Third Normal Form (3NF)

A database must comply with the following rules to be considered 3NF:
  1. All the rules for 1NF and 2NF
  2. Eliminate fields that do not depend on the key

Example: The following table is in 2NF but violates 3NF:


How can I remember all that?

Here are the main ideas to help you remember each normal form:
  1. 1NF - Eliminate repeating groups (e.g. Price1, Price2, Price3)
  2. 2NF - Eliminate duplicate or redundant data (e.g. multiple records with same values)
  3. 3NF - Ensure all fields in the table are dependent on the primary key (e.g. city is dependent on the venue and not on the artist)

How do I fix this table structure?

The following tables show a properly normalized structure:


If you can think of a better example, please let me know. Thank you.

Original post date: January 26, 2016

Hide Datasheet Columns in Split Forms

I have heard many complaints about using a Split Form since its introduction in Access 2007. The main purpose of a Split Form is to display the current record in a Single Form View while also displaying the form's record source in a Datasheet View. As the user navigates the records on the form, both the single and datasheet forms will reflect the current record. Figure 1 shows an example of a typical Split Form.


The biggest complaint I've heard about Split Forms is the apparent inability to hide the datasheet columns using VBA.
Before Split Forms, developers had to use a subform in datasheet view and executing either of the following code will easily hide a datasheet column:
Me.SubformContainerName.Form!ColumnName.ColumnWidth = 0
or
Me.SubformContainerName.Form!ColumnName.ColumnHidden = True
However, executing the above codes in a Split Form does not seem to work.

Actually, the above codes can also work on a Split Form, but the change is not reflected immediately. The Split Form must be saved, closed, and reopened before the change can be seen. And in my experiments, simply using Me.ColumnWidth or Me.ColumnHidden seems to work inconsistently depending on certain factors. As such, the above approach is not a very good solution.

Another approach for hiding the datasheet columns is by using the following code:
DoCmd.RunCommand acCmdUnhideColumns
The above command will open the dialog window shown in Figure 2.


To hide a column, uncheck the checkbox; and to unhide a column, check the checkbox. The problem with the above solution is that it requires user interaction. If your application needs a functionality to allow the user to select which columns to hide, then this approach will be appropriate for you. But if you don't want the user to have to choose which columns to hide, then you need a solution like the ColumnWidth or ColumnHidden approach above but with the ability to immediately reflect the changes. Luckily, that is still possible using VBA code.

The trick is to approach the problem from a different angle. We know that simply referring to the Split Form using Me.ColumnWidth or Me.ColumnHidden does not always work, but the datasheet object on the Split Form is also accessible through the Screen object. Therefore, to hide a column in a Split Form, all we need to do is execute the following code:
Screen.ActiveDatasheet.ColumnName.ColumnHidden = True
And voila! The above code should allow you to hide any column in the Datasheet View of the Split Form.

Caveat: Please remember that the topic of this article is focused on hiding a column in the datasheet portion of the Split Form. Thus, none of the above code affects the Textbox control on the Single View Form. If you also want to hide the corresponding control on the Single View Form when you hide its matching column in the Datasheet View Form, then you can still use its Visible property. However, hiding controls on the Single View Form will not automatically rearrange the other controls to take its place like it does in the Datasheet Form. If you want the other controls to take the place of the hidden control, that's another story.

Cheers!

Original post date: September 19, 2015

Report Gridlines

I don't normally create reports in my databases because I prefer to export the data into Excel or other format, so that the user can further analyze them. However, I have seen enough questions in the forums regarding "drawing lines" on a report that made me think maybe some people were not aware of this feature.

Gridlines, if I am not mistaken, were added as a feature starting with Access version 2007 (in conjunction with the Layouts). Essentially, it's a new way of drawing border lines around the controls on a report. For example, take a look at Figure 1.


Figure 1 shows a typical setup if the user wanted an Excel or datasheet look for the data displayed on the report. This is typically done by turning on the border for each control. However, if any of the controls has its Can Grow property set to Yes, then we might get the result shown in Figure 2.


Prior to having the Layouts and Gridlines features, most developers resort to using the Line method to draw lines on the report to achieve something similar to what we see in Figure 3. But with Layouts and Gridlines, no code is necessary.


To achieve the effect shown in Figure 3, we just need to select all the controls in the Details section and apply a Layout, Tabular in this case (see Figure 4).


So we're done, right? But wait, the title of this article is about "Gridlines," so what's so good about them? Well, I'm glad you asked. Take a look at Figure 5 to see the difference between how the gridlines are drawn in relation to how the borders are drawn on the report.


As you can see in Figure 5, the gridlines are drawn in between each row (and column, not shown) of data. So how is that better? Well, take a look at Figure 6 where we turned off all the borders and just used gridlines.


Again, the lines shown in Figure 6 were used to be achievable only by using the Line method in previous versions of Access. But now, it is a lot easier to create lines without using code by using the Layouts and Gridlines features.

Now we're done. Hope you find this article informative. All comments are welcome. Thank you!

Original post date: August 6, 2015


Extract Email Address

This topic is really about Regular Expressions. If you do not know, Regular Expressions are text strings used as a search pattern for matching  a group of characters within a larger string. You might think of them as "wildcard" characters. However, they can do more than just match characters in a string because you can embed "rules" within the search pattern that the search engine will use to evaluate a match.

For example, if you use a wildcard character in an Access query, you might use something like this:
WHERE LastName Like "a*"
In this example, the "*" is a wildcard character that tells the database engine to match all records with last names beginning with the letter "a." But what if you wanted to return all records with last names that begin with the letter "a" or the letter "b?" You might use something like this:
WHERE LastName Like "a*" OR LastName Like "b*"
So far, so good. But what if you wanted all records with last names that begin with the letters "a" through "g?" You would have a very long WHERE clause if you continue with the above syntax.

Enter Regular Expressions

So, to help with that kind of situation, Access allows us to use limited forms of regular expressions in queries. For example, to return records with last names that begin with the letters "a" through "g," we can use the following criteria:
WHERE LastName Like "[a-g]*"
Much simpler, right? However, like I said earlier, the Access' database engine only gives us limited regular expression capabilities. To take full advantage of regular expressions, we'll need to use VBA and an external regular expression engine. Fortunately, there is a library that is available to us as a reference called "Microsoft VBScript Regular Expressions x.x"
To show how powerful regular expressions are, the following code example shows how it can be used to extract an email address from a Memo field. I used this example as a response to a question in the MSDN forums. The user wanted a way to extract the email address from a Memo field that contains data similar to the following:
Lastname: Doe
Firstname: John
Email address: john.doe@acme.com
Company: Acme Co.
First, a disclaimer: I don't claim to be an expert in regular expressions. In fact, I rarely use them. I just know that if the situation is right, they can be a very powerful tool to use. I would encourage you to learn more about regular expressons to enhance your applications.
Here's a code example that uses a regular expression object to look for an email address within a string.
Public Function ExtractEmailAddress(strData As String) As String
'http://accessmvp.com/thedbguy
'6/19/2015
'Extracts the first email address within a string
'regex email pattern source: http://www.regular-expressions.info/email.html

Dim regEx As Object
Dim regExMatch As Object

Set regEx = CreateObject("VBScript.RegExp")

With regEx
    .IgnoreCase = True
    .Pattern = "\b[0-9A-Z._%+-]+@[0-9A-Z.-]+.[A-Z]{2,4}\b"
    Set regExMatch = .Execute(strData)
    If regExMatch.Count > 0 Then
        ExtractEmailAddress = regExMatch(0).Value
    Else
        ExtractEmailAddress = "No email found!"
    End If
End With

Set regEx = Nothing
Set regExMatch = Nothing

End Function
Notes: The above code example uses late binding, and it will only return the first email address found, if any. To see a modified version of the above code that returns all email addresses found as a delimited string, please visit my website.

I hope this short article piques your interest into regular expressions, and perhaps, I will be learning a thing or two from you very soon. Thank you for reading.

Original post date: June 28, 2015

Combobox Gremlins

This time, I thought it would be nice to have a little fun for a change. So, in this blog, I will need your participation. I will post a question, and I hope many of you will provide me with "an" answer. It doesn't have to be "the" answer, just tell me what you "think" is the answer. Later on, we can all "vote" on the best one. Are you ready? Let's get started...

To participate in this exercise, you will have to download this file. When you open it, you will see that it contains one table and one form. The form only has one control on it, a combobox. If you click the dropdown for the combobox, you will be presented with several choices. So far so good.

Now, here's the "fun" part... If you go to the form's design view and select the combobox, you can take a look at the Row Source property and see what's in it. Did you see it? So, here's my question. Where are the choices for the combobox dropdown coming from?

Background

This sample database was actually part of something that I inherited recently. I was asked to modify the choices for the combobox and realized something was weird about it. I know where the choices originally came from, but I couldn't figure out how they are showing up in the dropdown. If I change the Row Source from "*" to something like "test," that change is not reflected in form view - I still see the old choices in the dropdown. If I remove the Row Source and change the Row Source Type from Value List to Table/Query, then it behaves normally with the dropdown showing empty. However, as soon as I change the Row Source Type back to Value List, the old dropdown list returns.

What do I think is happening?

Here is my speculation on the issue... You know how Microsoft said that a form can only have so much controls added to it over its lifetime? I was wondering how does it keep track of that number? So, my guess as to what's happening with this form is that the Row Source for the combobox is being tracked somehow and stored somewhere that when you change the Row Source Type back to Value List, the original Row Source returns. However, that doesn't explain why the old Row Source still displays even when I manually change the Row Source property.

What do you think?

I would like to hear your explanation of this issue, because I think it would be nice to learn the truth about something like this. You can either leave a comment below or send me an email.
I have always admitted that I don't know everything about Access, and this is one definite proof of that. But with your help, I hope to learn something new. Thank you for participating!

Original post date: May 28, 2015

When to use the "Me" keyword

If you're new to VBA developement, you may have wondered what the "Me" keyword stood for. If you have experience with other programming languages, you may be familiar with the use of "this." It's basically the same concept. "Me" refers to the current object (in context). For instance, if you wrote a code behind a form, "Me" would refer to that form. If the code was written behind a report, then "Me" would refer to that report.

As an example, to refer to a control on a form, the code might look something like this:
Me.ControlName
That's basically the same as the following:
Forms!FormName.ControlName
So, the question is then, when should or could you use "Me" in your code?

As I mentioned earlier, "Me" is a shortcut way to refer to the current object. So, if you're code is executing behind a form or report and you want to refer to the controls or properties of that object, you can use "Me" in your code. If, however, your code is executing within a Standard Module, then using "Me" would be inappropriate, i.e. it will not work. If that's the case, you can either pass a form object to your code or use the forms collection syntax (e.g. Forms!FormName) to refer to form controls and properties.

One other very important thing to remember is that "Me" is a VBA-only construct. In other words, you cannot use "Me" in queries or macros. It cannot even be used in the Control Source on forms and reports. For example, using the following as control source in a textbox will result in an error:
=Me![FieldName]
To get around that, Access allows us to use the "Form" keyword. So, to fix the error, the above would have to be written as follows:
=[Form]![FieldName]
Unfortunately, for queries and macros, your only choice is to use absolute referencing using the Forms!FormName syntax.

Original post date: April 30, 2015

Trusted Locations

Starting with Access 2007, Microsoft implemented the concept of Trusted Locations. If you received a database file from an external source and open it for the first time, you might see the image shown in Figure 1.


To protect users from malicious code, Access automatically disables code execution for all untrusted database files. What it means is that any VBA code will not execute until the file is trusted or the code is enabled (some actions in embedded macros and the Autoexec macro will still run). To enable the code, you can click on the "Enable Content" button on the Security Warning bar shown in Figure 1. However, rather than enable the code for every database file you open, you can also choose to store them in a "trusted location."

How to add a Trusted Location

To create a trusted location, go to the Office button (Access 2007) or the File tab (Access 2010 and later) and click on Access Options (2007) or Options (2010 and later) to open the Access Options Dialog Window. From the Access Options Dialog Window, click on the "Trust Center" label on the left navigation pane as shown in Figure 2.


From the Trust Center pane, click on the "Trust Center Settings..." button to open the Trust Center Dialog Window. From the Trust Center Dialog Window, click on the Trusted Locations label on the left navigation pane as shown in Figure 3.


To add a trusted location, click on the "Add new location..." button to open the Trusted Location Dialog Window as shown in Figure 4.


Clicking on the "Browse..." button will open a file browser window where you can search for the folder that you want to designate as a Trusted Location. You can also place a check mark on the checkbox labeled "Subfolder of this location are also trusted" if you want to trust all files in the subfolders from that folder location.

After you have selected the folder you want to designate as a trusted location, just click on the OK button, as shown in Figure 5, to close the folder browser window. Click OK on the Trusted Locations Dialog Window to add the selected folder to the list of trusted locations.


Figure 6 displays the selected folder was added to the list of Trusted Locations for your computer. If you want to remove a folder from the list of Trusted Locations, highlight the folder and then click on the "Remove" button.


When you have finished configuring your system's Trusted Locations, click "OK" to close the Trust Center Dialog Window and then click "OK" one more time to close the Access Options Dialog Window.

When a folder is designated as a Trusted Location, any database file stored in that location will have their code automatically enabled when the user opens the database file, and the warning message shown in Figure 1 will not display.

Original post date: February 23, 2015

Thursday, February 18, 2016

Temporary Database

In an earlier blog, I mentioned about writing an article on how to use a temporary database for manipulating data that does not cause the front end to increase in file size. Unfortunately, I got side-tracked and forgot about it until recently when someone reminded me about what I said and requested that I write the article now. I apologize for the long delay and hope that this article and the attached demo will help clarify what I meant back then.

To recap, it is sometimes unavoidable to use temporary tables as a working space to manipulate the data before it can be consumed to represent its final form. However, doing so results in the size of the database file to increase almost exponentially each time this happens. It then becomes necessary to perform a compact and repair at a regular interval to keep the file size to a minimum and prevent reaching the 2GB limit.

As an alternative, the working data can be moved to a separate and temporary database file, so the size of the front end file will not be affected. That is what this demo file will try to illustrate. Please click on the image below to download the file.


How it works.

The demo contains a table with the data that is required to be manipulated. Instead of creating a temporary table, the demo creates a temporary database in the same folder as the front end file. It then copies the data from the local table into the temporary database. A linked table is then created to establish a connection between the front end and the temporary database. As the linked table is created, a security warning may display. This can be avoided by creating the temporary database in a Trusted Location. When the user closes the database, the temporary database file can be manually deleted. The demo automatically deletes the temporary database file prior to creating a new one.

Please let me know if you have any questions. Thank you.

Original post date: July 31, 2015

Sending out Email using CDO

I know there are a few demos already available showing how to send out an email from Access using SMTP and CDO, but I received a request in the forums recently to simplify ("dumb down") the process. So, to that respect, the following demo just shows the very basics on how to use CDO (Collaboration Data Objects) using one form where all the essential elements for setting up the email object is contained in one subroutine. Click on the image below to go to the download page. Enjoy!


As usual, please let me know if you have any comments or questions. Thank you.

Original post date: December 23, 2014

Anchoring

The anchoring feature has been available since Access 2007, but I noticed from several questions posted in the forums that some users are still not aware of it, or that they are not sure when to use it. It's always been considered best practice to design Access forms to the least common screen resolution for your users. But in today's proliferation of large screen monitors with really high screen resolutions, how do you accommodate usability with good design. Essentially, the dilemma is how to design a form for a small screen and yet look good on a large one.

Before Access 2007 and the anchoring feature, most developers resort to some API routines to re-size the form and its controls automatically based on screen resolution. This technique worked very well but not without its drawbacks, such as the additional dependency to the OS API code and the additional burden of maintaining extra code to accommodate varying user environments.
Anchoring can help alleviate some of the problems with designing Access forms for different screen resolutions. One caveat, however, is that it's not the answer to all the problems with re-sizing form controls. To illustrate how to use the anchoring feature, we will use the simple table structure shown in Figure 1.


As you can see in Figure 1, it's a table for storing information about a business or personal contacts. Figure 2 shows a typical Access form designed for this Contacts table using as little screen real estate as possible.


Please note that the Address and Notes fields were intentionally left small to illustrate anchoring features later on in this article.
If we view that form in Form View, we might see something like what is shown in Figure 3.


Figure 3 displays the form in a Tabbed Document setting, which is the default settings in Access. Notice that there are plenty of "white" space on the form when the form is maximized to cover the whole screen. Figure 4 shows some design changes we can do to this form with the anchoring feature.

As shown in Figure 4, the "Exit" button would look better all the way to the right of the form. Also, we are going to move the photo to the right edge of the form as well to make room for expanding the Address and Notes fields. In addition, we will make the Notes field expand towards the bottom of the form as well.


To access the Anchoring feature, we must go back to the form's Design View and select the control that we want the anchor applied. Once the control is selected, we then click on the Arrange tab on the Ribbon and then click on the Anchoring dropdown to select the anchor we want. Figure 5 shows the Exit button on the form was selected and then the "Top Right" anchor was then applied to it.


To finish applying anchors to our form, we would then select the attachment control and also apply the Top Right anchor to it. We would then apply the Stretch Across Top anchor to the Address field and the Stretch Down and Across anchor to the Notes field. Figure 6 shows the final product after these changes.


As you can see from Figure 6, some of the white-spaces were removed but not completely eliminated. You will have to play with the design of your forms and test the other anchor settings to find the best form design for your database application.

The anchoring feature is a simple way to accommodate various screen resolutions due to varying user environments, and it eliminates the need to maintain additional code for re-sizing form controls. However, you must be aware of its limitations because it does not cover all the possible scenarios that you may encounter within your users' environments.

Original post date: November 30, 2014

Placeholder Records

I have always recommended against "placehoder" records (with possible exceptions), but someone in the forums recently asked me "why?" So, to explain my reasoning, I have decided to write an article about it.

What is a "placehoder" record?

First, we'll need to define what I consider as placeholder records to help define why I oppose them. To do that, I will try to use some concrete examples of what I consider as placeholder records (other developers may have a different definition of what is a placeholder record).

My definition of placeholder records are records created in advance and stored in the table to represent future records. In other words, these records are created in anticipation of possible records that may or may not be needed in the future. For example, let's say you have a database to track class attendance. If a class will have a total of ten sessions, you might be tempted to create ten records, in advance (at the time of enrollment, for example), per student to make it easier to mark if a student attended each session. They are considered placeholder records because you are creating records to represent future class sessions.

Other examples of potential placeholder records may be found  in booking databases (room and equipment rentals or theater shows to track daily occupancy or usage) or property management databases (apartment or house rentals to track monthly payments).

So, why are they bad?

Well, I probably wouldn't say they are bad but more like unnecessary. Records should only be created when they are needed and not before. For example, if we take the example of the class attendance database, each attendance record should only be created when that particular class session occur. And even then, I would also recommend that you only create records for those in attendance. There's really no need to create records for the absent students, because we can always determine who they are by comparing the list of students from those who attended the class. You can also create a query to show both attendees and absent students as the record source for your form or report.

If you need to produce sequential records for use in a crosstab query or a daily status report, you have the option of using a cartesian product query as presented in an earlier blog article: A practical use of a Cartesian query. That article demonstrates the use of a Tally table, which I also prefer over creating a table of sequential dates.

If you like the convenience of having placeholder records in the table for your data entry forms, that can also be addressed by other methods such as using a temporary table or a multi-select listbox. The user can select all the records to be created from the temporary table or listbox, and then VBA code can be used to actually add those records into the table.

Conclusion

So, to summarize, placeholder records could take up space in the table when it is not actually needed. They don't necessarily violate "normalization" rules, but it's considered best practice to avoid using placeholder records. Hopefully, I have described how the common benefits of creating placeholder records can be easily addressed without actually creating placeholder records.
The next time you hear me tell someone to avoid creating placeholder records, you now know my reasoning behind it. I would like to hear other perspectives on this topic, so please leave a comment to share your thoughts.

Thanks for reading!

Original post date: October 27, 2014

Hide Options Menu from Backstage

There have been a couple of times when users in the forums asked how to hide the backstage menu, specifically Options, to prevent their users from making adjustments to the database settings. When a database application is executed in a runtime environment, most of the menus are disabled; but sometimes, that is not enough to protect the database from curious users. One possible approach is to create a custom Ribbon that manipulates the Backstage to hide these menus.

Figure 1 shows a typical Access 2010 File Menu (Backstage) with all the choices available.


Figure 2 shows what the File Menu might look like after applying the custom Ribbon that manipulates the Backstage.


To achieve the result shown in Figure 2, just include the following XML snippet within your custom Ribbon.
<backstage>
  <button idMso="FileSave" visible="false"/>
  <button idMso="SaveObjectAs" visible="false"/>
  <button idMso="FileSaveAsCurrentFileFormat" visible="false"/>
  <button idMso="FileOpen" visible="false"/>
  <button idMso="FileCloseDatabase" visible="false"/>
  <tab idMso ="TabInfo" visible="false"/>
  <tab idMso ="TabRecent" visible="false"/>
  <tab idMso ="TabNew" visible="false"/>
  <tab idMso ="TabPrint" visible="false"/>
  <tab idMso ="TabShare" visible="false"/>
  <tab idMso ="TabHelp" visible="false"/>
  <button idMso="ApplicationOptionsDialog" visible="false"/>
  <button idMso="FileExit" visible="false"/>
</backstage>
To see this in action, please download the demo file here. As usual, I would appreciate any comments or feedback. Thank you.

Original post date: September 30, 2014

Assigning Ribbons to Forms and Reports using VBA

I was recently asked to upgrade an Access 2003 database into Access 2010. I thought to myself "that can't be hard," so I went ahead and accepted the challenge. The old database file used a Switchboard, and all the Menu bars were hidden. That's great, so I thought all I had to do was also hide the Ribbon because everything the user needs would be in the Switchboard anyway (I decided not to convert the Switchboard to a Navigation Form because I didn't want to deal with new problems).

So, I moved all the objects from the old database into a brand new ACCDB file and removed all references to any ActiveX objects. Once I debugged out all the errors, I gave the new application to the client. Then, I realized that one thing I forgot to do was provide a Ribbon for the reports (remember, I had hidden the Ribbon for the whole application). I guess I could just "unhide" the Ribbon when a report is opened, but I thought I would give the client a taste of the new Access 2010 features and create a custom Ribbon for the reports.

Now, there were quite a few existing reports in this database, and it would take me some time to assign the new custom Ribbon to these reports. So, I decided I would just create a function to do the assignment for me. The following is what I came up with:
Public Sub AssignReportRibbon()
'accessmvp.com/thedbguy
'7/18/2014

Dim rpt As Variant

For Each rpt In CurrentProject.AllReports
    DoCmd.OpenReport rpt.Name, acViewDesign
    rpt.RibbonName = "RPTReport"
    DoCmd.Close acReport, rpt.Name, acSaveYes
Next

End Sub
However, it didn't work because I kept getting an error on this line:
rpt.RibbonName = "RPTReport"
I couldn't understand it, so I Googled around for an answer. Luckily, I discovered that fellow MVP, Daniel, had already figured it out. Check out his blog post here. So, based on his discovery, I modified my code to the following:
Public Sub AssignReportRibbon()
'accessmvp.com/thedbguy
'7/18/2014

Dim rpt As Variant

For Each rpt In CurrentProject.AllReports
    DoCmd.OpenReport rpt.Name, acViewDesign
    Reports(rpt.Name).Report.RibbonName = "RPTReport"
    DoCmd.Close acReport, rpt.Name, acSaveYes
Next

End Sub
And voila, it now works! It can't be that hard to convert that code to use it for Forms, but I'll leave that challenge for you.
Please let me know if you have any questions. Thanks, as always, for reading.

Cheers!

Original post date: July 30, 2014

Requested type library or wizard is not a VBA project

Do you use Navigation Forms in your database projects and have seen this error message?


If so, please read on to hear about my experience running into this issue and learn what I had to do to fix the problem.

After avoiding to use Navigation Forms since it's introduction with Access 2010, I recently found myself without any choice because our IT department decided to disable all custom ribbons on our network for security reasons. Please don't get me wrong, I personally don't think there's anything particularly wrong with Navigation Forms. On the contrary, I think they are a huge improvement over the old Switchboard, but I never used the Switchboard much either (only on occasions). So, when the custom ribbons came out in Access 2007, I thought it was a better use of space for a menuing system and decided to design all my user interface using custom ribbons. However, when our IT system was recently upgraded to Office 2010, my Access 2007 custom ribbons stopped working because of our new network security configuration. So, I decided to give Navigation Forms a try.

There may be other instances where the subject error message can occur, but I ran into it when I decided to use a Navigation Form with 2-Level Horizontal Tabs.


Now, please note that just by creating a Navigation Form with 2-Level Horizontal Tabs won't necessarily produce the error mentioned above. Instead, this problem may only reveal itself when you compile your project into a ACCDE file. In other words, you might not realize that there's a problem while testing your project using the full version of Access until you deploy a compiled version or your database application to your users.

What is causing this?

Interestingly enough, some people may not even run into this issue at all. What causes this problem is when you are using any VBA code behind your Navigation Form. For example, you'll run into this problem if you have a Load Event procedure to hide certain tabs depending on the user's security level or if you have an Open Event procedure to change the label captions on your Navigation Form. Unfortunately, just deleting all the codes will not be enough. The mere fact that you have the "Has Module" property set to "Yes" will also cause this problem.


So, how do I fix it?

Of course, the easy answer is to just set that property to "No." And when you do that, Access will give you this warning, which you'll need to pay close attention to:


As you can see from the bolded part of that warning message, setting the Has Module property to No will "delete" all the VBA code you have behind that form. So, if you have any code behind the form, I suggest that you save them outside of the form for future reference before you change this setting.

If you *must* have some code run behind your Navigation Form, I recommend that you use Macros instead. You can take all the VBA procedures you removed from the form and convert them into macros to be used in your Navigation Form. Using macros to execute your form logic will not produce the error that using VBA procedures does. Unfortunately, there is no utility to convert VBA into macros, so you'll have to do that process manually.

Like I said earlier, I am not sure what other situations could result in this error, but I hope the solution presented here will somehow help fix those problems as well.

Original post date: May 27, 2014

How to build strings in VBA

I promised a member at UtterAcess that I will write a blog about how to build a string in VBA, particularly when constructing a SQL statement, so here goes...

Delimiters

Before we start building a string in code, I think it's important to understand the concept of "delimiters" first. When you declare a String variable in VBA, the value you assign to it must be delimited with a double-quote character. For example:
strVariableName = "Some String Value"
That should be easy enough to understand, but the problem comes when building a string while concatenating field values into the string as well. Table fields have different data types and some data types need a specific delimiter when using them in code. The most common data types and their corresponding delimiters are as follows:

Data TypeDelimiter
TextDouble-quote (") or Single-quote (')
Date/TimeOctothorpe (#)

Here are some examples of their uses:
rs!CompanyName = "UtterAccess"

rs!CompanyName = 'UtterAccess'

rs!VisitDate = #4/29/2014#

rs!VisitTime = #10:30 AM#
As you can probably imagine, the problem we will try to tackle in this article is in how to build the string with Text data types within it since both String variables and Text data types use the same delimiters that usually causes some confusion during coding.

Building the string one step at a time

We are going to discuss an approach that was presented by another UtterAccess member when tackling this issue. First, let's look at the final version of the string we're trying to build. The goal will be to write code that will result in a string value that looks like this:
INSERT INTO tblCustomers (CustLastName, CustFirstName, CustNo, DOB)
VALUES ("O'Hara", "Scarlett", 1936, #4/28/1861#)
In our code, we will assume that each value to be inserted into the table are held in variables called strCustLastName, strCustFirstName, lngCustNo, and dteDOB. We will then insert these variables in their proper places to replace the hard values we used above.  Let's get started:

Step 1 - Naturally, the first thing to do is to delimit the whole value because it is a string, so let's add a double-quote at the beginning and at the end of our string:
"INSERT INTO tblCustomers (CustLastName, CustFirstName, CustNo, DOB)
VALUES ("O'Hara", "Scarlett", 1936, #4/28/1861#)"
Step 2 - Next, we will replace the  hard values with the variables that represent each hard value:
"INSERT INTO tblCustomers (CustLastName, CustFirstName, CustNo, DOB)
VALUES (strCustLastName, strCustFirstName, lngCustNo, dteDOB)"
Step 3 - Now, the variables must be concatenated into the string so that VBA will then replace them with the values they represent when the code executes:
"INSERT INTO tblCustomers (CustLastName, CustFirstName, CustNo, DOB)
VALUES (" & strCustLastName & "," & strCustFirstName & ","
& lngCustNo & "," & dteDOB & ")"
Notice how we enclosed each segment of the concatenation with the double-quote delimiters because we are now trying to combine multiple strings together.

Step 4 - At this point, we'll need to add the proper delimiters for each data type for our variables. Remember that strCustLastName and strCustFirstName variables are for the CustLastName and CustFirstName fields respectively, which are Text fields and therefore need a double or a single quote for its delimiters. The lngCustNo variable represents the value for the CustNo field, which is a Number data type and therefore does not need any delimiter. And, the dteDOB variable is for a Date/Time field, which requires the octothorpe (hash mark):
"INSERT INTO tblCustomers (CustLastName, CustFirstName, CustNo, DOB)
VALUES (""" & strCustLastName & """,""" & strCustFirstName & ""","
& lngCustNo & ",#" & dteDOB & "#)"
Notice how we actually used two double-quotes to delimit the Text data types (strCustLastName and strCustFirstName)? Now would be a good time to discuss some possible issues with Text data types when concatenating them into string values. If the hard values we expect will never contain a single-quote within it, then we could have just use a single-quote as delimiters and be done with it. However, remember that for our example, the strCustLastName variable actually represents the hard value "O'Hara." So, using a single-quote to delimit that variable will fail because the hard value also contains a single-quote. So to avoid that problem, we need to use a double-quote as a delimieter. But why use two of them? Well, if we used just one double-quote, then VBA will interpret it as the delimiter for our string (the whole thing that we're building) instead of just for the variable. So, we used two double-quotes to tell VBA to replace it with one double-quote when it interprets the code during execution.

Step 5 - Actually, that's it. We're done! There's no Step 5. However, one last item that I need to point out is that I didn't use any "continuation" character in the above code examples to reduce any confusion while learning the basic concept of building the string in code. So, the above code samples should be considered as one long line even if they were displayed as multiple lines above. If you wanted to break them down into multiple lines in your code using the continuation character, it might look something like this:
strSQL = "INSERT INTO tblCustomers (CustLastName, CustFirstName, " _
               & " CustNo, DOB) VALUES (""" & strCustLastName _
               & """,""" & strCustFirstName & """," & lngCustNo _
               & ",#" & dteDOB & "#)"
If you want to see the UtterAccess thread that inspired this article, click here. As usual, thanks for reading, and I would appreciate any comments or feedbacks.

Original post date: April 28, 2014

Friday, February 12, 2016

Text or Hyperlink

This is a topic of discussion that I have participated in the forums a number of times in the past and will probably continue to engage in the future. I have decided to write an article to summarize my opinions on this subject. Essentially, the dilemma is whether to use a Text or a Hyperlink field to store a "link" to a file or folder or website, etc.

First of all, let me clarify that I am not exclusively in one camp or the other. Rather, this article just attempts to bring up points and counterpoints regarding the advantages and disadvantages of using one or the other in your database.

Using a Hyperlink Field

When designing a table in Access, using a Hyperlink field may be the easiest choice when trying to store "link" data. For example, let's say you are creating a table for clients and you want to include a field that points to a network folder where you store all the documents relating to each particular client. Using a hyperlink field makes this easy because it comes with built-in functionalities that alleviates the developer from writing code to make it work. For example, by right-clicking on the hyperlink field and selecting Hyperlink > Edit Hyperlink, the user is presented with a dialog box for building the hyperlink. For our scenario, the user can navigate to the folder location and then click 'OK' to store the link to that folder in the table. Once the link is stored in the table, the user can simply click on the field to open a folder window to gain access to all the documents for that client.

Advantages

The main advantage of using a hyperlink field is its ease of use and creation. The hyperlink builder is very intuitive and Access does all the work for you. There's no need to write any code to open the folder window or email client or whatever the program the link requires. It just works!
Another huge advantage of using a hyperlink field is that it can store "any" link. That means you can have one field that can store links to a file or folder path, a website, an email address, an FTP site, etc. Access should reconize the protocol specified in the hyperlink and then execute the appropriate program to open the link. This again would be a big task for the developer to determine the appropriate action to take and program to execute based on the protocol embedded in the link.
The last advantage of using a hyperlink field is that you can "display" a short text in place of the actual link to help the user understand better what the link is pointing to. For example, instead of seeing the full path to the folder such as \\ServerName\OfficeLocation\DepartmentNo\ClientName\Proposals, you can simply display something like "Client Proposals." Clicking on the link will automatically take the user to the correct folder path.

Disadvantages

Unfortunately, that last advantage of the hyperlink field can also be considered as a disadvantage by other developers. For anyone not familiar with how hyperlink fields are stored in the table, it actually has three components separated by hash marks: the display text, the hyperlink address, and the hyperlink subaddress. So, in the above example, the hyperlink address is the full folder path, and the display text is "Client Proposals," which is all the users see when looking at the data.
The problem appears when the developer starts to use the value in the hyperlink field in code. For example, if we add an unbound textbox on a form bound to a table with the hyperlink field and use the following as its Control Source: =[HyperlinkFieldName], you will see the actual value stored in the table instead of just the hyperlink address, which is what we would normally want. For the above example, the unbound textbox will display the following value:

Client Proposals#\\ServerName\OfficeLocation\DepartmentNo\ClientName\Proposals#

Notice the hash tags separating the other components of the hyperlink field? If the user sees that, it could cause some confusion. Also, grabbing the hyperlink address using code by just referencing the field's value could cause unexpected results. For this reason, some developers prefer to use a text field instead.

Using a Text Field

As I have mentioned above, a hyperlink field may have many advantages for beginners but most experienced developers will try to avoid the pitfalls and additional maintenance that may be brought on by using it and opt to use a text field instead. A text field doesn't disguise what is stored in the table and it's easy enough to simulate a hyperlink using a text field.

Advantages

I already mentioned the main advantage of using a text field - what you see is what you get. What is being displayed in the field is exactly what is stored in the table, no surprises. Because of that, the developer is then free to manipulate the data using code. The simplest approach to simulate a hyperlink using a text field is by using the following code:
Application.FollowHyperlink HyperlinkFieldName

Disadvantages

This may not matter to seasoned developers but the first disadvantage of using a text field to simulate a hyperlink is the need to use code. As you can see above, it's not really hard to do that. However, if you can remember one of the advantages of a hyperlink field, if there's a situation where the "link" data stores various types of protocols, then the code to execute the hyperlink can become vastly complicated. For example, simply using the FollowHyperlink method when the link only contains the following data will not work because it is missing the proper protocol: thedbguy.blog.com. The developer may have to include additional logic to the code to assign and use the appropriate protocol for the link in question. These protocols might include types such as ftp, news, gopher, etc.

Conclusion and Disclaimer

Understanding that a hyperlink field really contains three components helps the developer get a better handle in manipulating the link data. But, if the purpose of the hyperlink field is just to store websites, email addresses, or file/folder paths, then using a text field will probably save you the frustration of dealing with the surprises that comes with a hyperlink field.

As I mentioned in the beginning, I am not really recommending to use one over the other but merely trying to bring up possible arguments that you may hear when you get into a discussion regarding this topic with others.

Oh, and by the way, if you were wondering how to grab just the hyperlink address from a hyperlink field as if it was a text field, you can try the following code:
Split(PlainText(HyperlinkFieldName),"#")(1)
As usual, any comments are welcome. Cheers!

Original post date: March 28, 2014

Query Join Basics

Recently, I have noticed a few developers, new to Access, showing up in the forums and were confused by the different JOINs that can be used in a query when retrieving basic information from their tables. This blog is my attempt of clarifying some of the basics regarding the different choices when joining or linking tables together in a query.

As I previously mentioned in my blog on Cartesian Query, there are basically three types of joins we can use when using multiple tables in a query:
  1. INNER JOIN - returns all matching records between the joined tables
  2. LEFT OUTER JOIN - returns all records from the "left-side" table and only the matching records from the "right-side" table (opposite of "right outer join")
  3. RIGHT OUTER JOIN - returns all records from the "right-side" table and only the matching records from the "left-side" table (opposite of "left outer join")

INNER JOIN

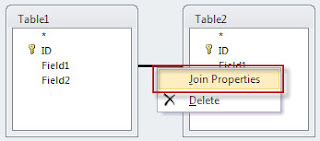
When two tables are linked using an INNER JOIN in a query, they might look like this:


In this example, the line between Field1 in Table1 and Field1 in Table2 will instruct Access to return all records from Table1 and Table2 where the values in Field1 between the two tables are a match. If Table1 had 15 records in it, and Table2 had 20 records in it but only 12 records match between the two, then the query will only show those 12 records that were a match.

LEFT OUTER JOIN

If we had wanted the query to return all the records from Table1 with all the matching records from Table2, we could use a LEFT OUTER JOIN. To create a LEFT OUTER JOIN, we would start with an INNER JOIN and then right-click on the "join line" between the two tables and select "Join Properties."


The following "Join Properties" dialog window will show up:


As you can see, the initial join was set to include only the records that match between the two tables (Join Type #1). To do a LEFT OUTER JOIN, we just need to select Join Type #2 and click the OK button. Once the Join Properties dialog window closes, the query designer should update the relationship line between the two tables with an arrow head pointing to Table2.


At this point, running the query will return all 15 records from Table1 and show 12 of them with matching values from Table2 and show Null values for the three records with no matching  values from Table2.

RIGHT OUTER JOIN

Creating a RIGHT OUTER JOIN is the same as the above process; but this time, we will select Join Type #3. This join type will return all records from Table2 and display any matching records from Table1. The arrow will now also point to Table1.


Running this query will return all 20 records from Table2 and show 12 of them with matching values from Table1 and show Null values for the eight records with no matching values from Table1.
Please note that if you view the SQL statement of the query when using either LEFT or RIGHT outer joins, the SQL statement does not actually use the keyword "OUTER." Instead, you will just see either "LEFT JOIN" or "RIGHT JOIN."

I hope that helps explain the basics between the different join types in an Access query. They should not be confused with the table joins used in the Relationship Window because, although they may look similar, that is actually somewhat a separate concept.

One final note regarding Access Query Joins, Jet SQL (the SQL language used by Access) does not support a FULL OUTER JOIN that full RDBMS like SQL Server does. To return all the records from both tables in Access, matching or not, you may have to use a UNION QUERY.

Original post date: February 28, 2014

Google Maps API

I know that there are already plenty of demos available on the Internet for using Google Maps in an Access database, so what could be different with this one? Well, most of the Google Maps demo I've seen involve using the web browser control to display the map in an HTML page that uses Google Maps API through JavaScript. That's because most Google Maps implementation in Access require a dynamic map.

But when a recent project required me to incorporate Google Maps on a report for printing, I found out that the usual approach of using a web browser control will not work. As a result, I had to search for an alternate solution. To see what I have discovered, click on the image below.


As usual, any comment is welcome and appreciated.

Original post date: January 13, 2014

Fillable PDF API Demo

In response to requests from some of you who have seen my original Fillable PDF Demo at UtterAccess, I have decided to post an Acrobat API version to show the difference between this approach as compared to using the XFDF method.

Please remember that this method is only useful if you have the full version of Adobe Acrobat installed on your machine. One advantage of this method is that you are able to save the filled out form as a PDF file.


Please let me know if you have any questions.

Original post date: December 25, 2013

Update Query with Append

I can't say how often this situation comes up in real life, but an UtterAccess member wanted to find out how to run a single query that will both update existing data in the table and add new records at the same time.

The Scenario

The member stated that he has a master table of data in Access and receives updated information every month in an Excel file. The Excel file contains the same information as the master table but with user changes to the data and possibly new information as well. The challenge is to update the Access table with the user changes and append the additional information as new records - at the same time.

The Usual Solution

The first step, usually, is to link to the Excel spreadsheet so we can access the data from within Access. We can then create an UPDATE query that joins the master table with the linked table to apply the latest changes to the data. However, this doesn't include the new information from the linked table.
As a second step, we might also create an APPEND query to grab all the new information from the linked table and add them to the master table. We would then need to execute both queries, one at a time, to complete the task of updating the master table.

The Combined Solution

But, since the challenge was to perform both the update and append actions in one query, we had to use a different technique. I can't say that this is a new technique because I'm sure it's been around for a while, and most of you probably already know it. I just thought of writing it down here as a possible reference for me in the future.
So, how do we execute an UPDATE and APPEND query at the same time? Well, we also start out by linking to the Excel spreadsheet to access the data. We then create one query that joins the master table to the linked table. However, in this case, we will use an OUTER JOIN to return all the records from the linked table.
As a result, the database engine will update existing data and append new records at the same time. Here's an example of how the query's SQL statement might look like:

UPDATE tblMaster
RIGHT JOIN tblExcel
ON tblMaster.FieldName=tblExcel.FieldName
SET tblMaster.FieldToUpdateOrAdd=tblExcel.FieldToUpdateOrAdd

Original post date: November 30, 2013

Pop-up, Modal, or Dialog Forms

This article is an excerpt, reprinted with permission, from the book "Professional Access 2013 Programming."

Pop-up, Modal, or Dialog Forms

Access forms can be opened within your application in three different window modes: Popup, Modal, or Dialog. These can be set manually using the property sheet or programmatically using VBA or macros. Each mode behaves differently and can be used for different purposes. You can also combine the modes to have even greater control over the way the user can interact with the form and the entire application when the form is open.

Pop-up

A pop-up form opens and stays on top of all other open forms within your application (actually, the pop-up form opens outside of the Access application window). Although it is on top of other objects, the pop-up form does not necessarily have to have the focus. This can be quite helpful when you want to present the user with some reference information that needs to be available while they are using or entering data on another form. A pop-up form also allows the user to access the ribbon buttons and menus.

You can create a pop-up form by setting its PopUp property to Yes. This property is often used in conjunction with setting other properties such as Modal, Cycle (of records) and Border Style.

Modal

A modal form opens and keeps the focus until it is closed (or hidden). When a modal form opens, the user will not be able to use other forms or even go to the ribbon (it won’t even let you click the Exit button to quit Access). This mode is useful when you want to control the user’s workflow by opening each modal form in sequence based on the task they’re doing.

You can create a modal form by setting the form’s Modal property to Yes. If you use both the PopUp and Modal properties, you can make the form behave both as a pop-up (stays on top) and a modal (keeps the focus) form by setting them both to Yes.

Dialog

A dialog form opens on top of all the other forms and also keeps the focus until it is closed (or hidden). There is one major difference with a dialog form’s behavior as compared to a form with its PopUp and Modal properties set to Yes. When a form is opened in dialog mode, all code execution is also “suspended” until the dialog form is closed. This type of behavior is very useful when you need user input before proceeding with the next logic in your code. Some examples of dialog forms are the “warning” messages from Access or the MsgBox() and InputBox() functions.

You can only open a form in dialog mode using code (VBA or macro). The form can be opened in dialog mode regardless of the PopUp and Modal property settings. You can use either of the following lines of code to open a form in dialog mode,

DoCmd.OpenForm "FormName", , , , , acDialog
or:
DoCmd.OpenForm "FormName", WindowMode:=acDialog

(The above excerpt can be found in Chapter 17, Page 262 of the book "Professional Access 2013 Programming.")

Original post date: October 2, 2013

Professional Access 2013 Programming


I am very proud to say that I had the privilege to work with the authors Teresa Hennig, Ben Clothier, George Hepworth, and Dagi (Doug) Yudovich on their latest book "Professional Access 2013 Programming as a contributor and technical editor. This book was written by developers for developers. It covers all the new features of Access 2013 including the new "Access App" paradigm as well as plenty of tips for client database development.

The book goes in detail in creating a web application using Access 2013 with Office 365/SharePoint 2013 demonstrating how powerful this new feature could be and proving that Access Apps can be used in real-world business situations. My favorite part of the book is learning the new data types and macro actions in Access 2013. I never had any interest in creating Access 2010 web databases because they were so limited and hard to implement, but the new Access 2013 web application is more powerful and fun to create. The authors wrote the chapters in a manner that was easy to follow - I had a working Access App after reading just the first few chapters.

The book also includes download files and demos that you can immediately implement to enhance your own database projects. I highly recommend this book to any developer. Whether you're involved in creating Access web solutions or not, this book will serve as a good resource and a valuable part of your toolkit.

Click here for more info...

Original post date: September 10, 2013

SimpleCSV()

I know there are already plenty of examples out there on how to concatenate records or child records into a delimited string, but I also see this request often enough in the forums that I wanted to have one place to point them to for a possible solution.

The following is just a simple function most users and developers can add to their database to quickly produce a delimited string of records they would like to combine. I purposely made it simple because all the bells and whistles, such as sorting the list or accepting listboxes as arguments, are already available on other websites, so there's really no need for me to reinvent the wheel for those.

To use this function, just pass a "SELECT" SQL statement and an optional delimiter to it. The power of this simple function is really in the creativity of your SQL statement. Please note there are no error handlers, so you'll have to add your own.

As always, I appreciate any comments you may have. Thank you.

Public Function SimpleCSV(strSQL As String, _
   Optional strDelim As String = ",") As String
'Returns a comma delimited string of all the records
' in the SELECT SQL statement
'Source: http://accessmvp.com/thedbguy
'v1.0 - 8/20/2013

Dim db As DAO.Database
Dim rs As DAO.Recordset
Dim strCSV As String

Set db = CurrentDb()
Set rs = db.OpenRecordset(strSQL, dbOpenSnapshot)

'Concatenate the first (and should be the only one)
' field from the SQL statement
With rs
 Do While Not .EOF
  strCSV = strCSV & strDelim & .Fields(0)
  .MoveNext
 Loop
 .Close
End With

'Remove the leading delimiter and return the result
SimpleCSV = Mid$(strCSV, Len(strDelim) + 1)

Set rs = Nothing
Set db = Nothing

End Function

Original post date: August 21, 2013

What's the opposite of DSum()?

A member recently posted a request in the forums for a function that does the opposite of DSum(). The intent was to have a query with a running total but using subtraction instead of addition. I never heard of anyone needing to do something like this before, so it was no surprise that I couldn't find a built-in function that does the opposite of DSum() or Sum() to offer the member.

I really don't know if anyone would ever need to do this again, but I just thought to share what I came up with in case it may be useful to someone else. The following function is very basic and does not include any error handling. Hopefully, you can modify it to suit your needs. I would happily accept any comments or recommendations to improve this function to better help those who may want to use it.

Public Function DDiff(strField As String, strDomain As String, _
    Optional strCriteria As String) As Variant

'accessmvp.com/thedbguy
'7/26/2013

Dim dbs As DAO.Database
Dim rst As DAO.Recordset
Dim strSQL As String
Dim varDiff As Variant

strSQL = "SELECT [" & strField & "] FROM [" & strDomain & "] "

If strCriteria > "" Then
    strSQL = strSQL & " WHERE " & strCriteria
End If

Set dbs = CurrentDb
Set rst = dbs.OpenRecordset(strSQL, dbOpenSnapshot)

With rst
    If Not (.BOF And .EOF) Then
        varDiff = .Fields(strField)
        .MoveNext
    End If
    Do While Not .EOF
        varDiff = varDiff - .Fields(strField)
        .MoveNext
    Loop
   .Close
End With

DDiff = varDiff

Set rst = Nothing
Set dbs = Nothing

End Function

To see the discussion that started it all, including a pure SQL solution, click here.

Original post date: July 27, 2013