Thursday, February 25, 2016

Normalization

This month, I decided to go back to basics. I know there are already plenty of articles regarding this subject. But since I am about to give a lecture about this topic to a small group of people this week, I thought I might as well post it here, so I can use it as a quick reference in the future.

What is Normalization?

Normalization is the process of designing a database table structure that organizes the data to minimize data redundancy and facilitate data integrity. The main objective of "normalizing" the data is to isolate the information so modifications to the data can be performed in just one table and then propagate throughout the database by means of related foreign keys.
There are defined "rules" to follow when going through the normalization process. When a database is properly normalized, it is considered to be in "normal form." For example, a database complying with the first rule is said to be in "First Normal Form (1NF)." Although there are several levels or rules for normalizing a database, most developers will attempt to comply only up to the "Third Normal Form (3NF)." 3NF is considered to be the highest level necessary for most database applications in use today.

First Normal Form (1NF)

A database must comply with the following rules to be considered 1NF:
  1. Eliminate repeating groups in individual tables
  2. Create a separate table for each set of related data
  3. Identify each set of related data with a primary key

Example: The following table violates 1NF.


Second Normal Form (2NF)

A database must comply with the following rules to be considered 2NF:
  1. All the rules for 1NF
  2. Create separate tables for sets of values that apply to multiple records (duplicates)
  3. Relate these tables with a foreign key

Example: The following table is in 1NF but violates 2NF:


Third Normal Form (3NF)

A database must comply with the following rules to be considered 3NF:
  1. All the rules for 1NF and 2NF
  2. Eliminate fields that do not depend on the key

Example: The following table is in 2NF but violates 3NF:


How can I remember all that?

Here are the main ideas to help you remember each normal form:
  1. 1NF - Eliminate repeating groups (e.g. Price1, Price2, Price3)
  2. 2NF - Eliminate duplicate or redundant data (e.g. multiple records with same values)
  3. 3NF - Ensure all fields in the table are dependent on the primary key (e.g. city is dependent on the venue and not on the artist)

How do I fix this table structure?

The following tables show a properly normalized structure:


If you can think of a better example, please let me know. Thank you.

Original post date: January 26, 2016

Hide Datasheet Columns in Split Forms

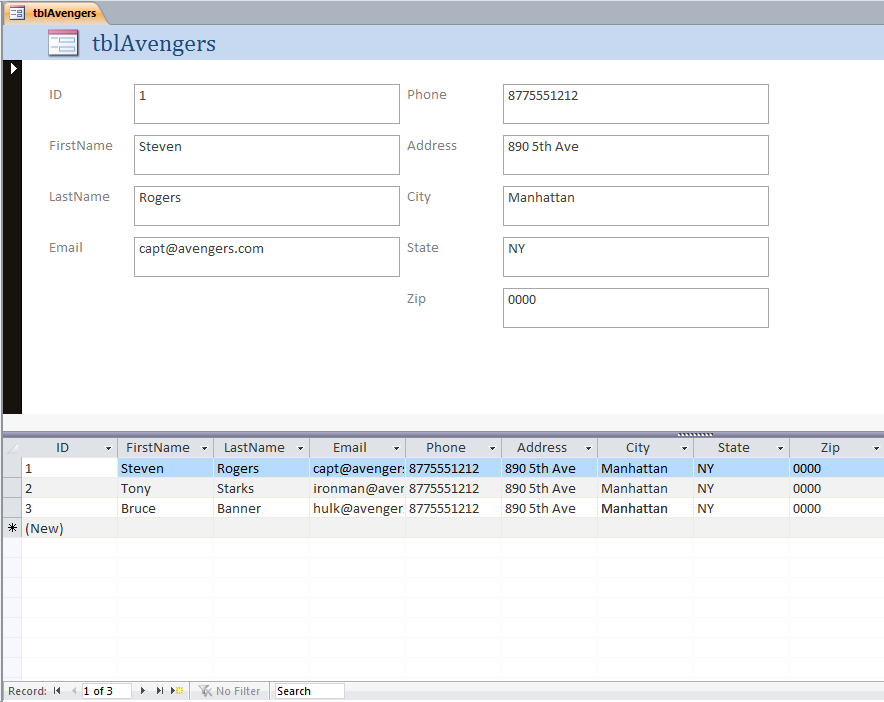
I have heard many complaints about using a Split Form since its introduction in Access 2007. The main purpose of a Split Form is to display the current record in a Single Form View while also displaying the form's record source in a Datasheet View. As the user navigates the records on the form, both the single and datasheet forms will reflect the current record. Figure 1 shows an example of a typical Split Form.


The biggest complaint I've heard about Split Forms is the apparent inability to hide the datasheet columns using VBA.
Before Split Forms, developers had to use a subform in datasheet view and executing either of the following code will easily hide a datasheet column:
Me.SubformContainerName.Form!ColumnName.ColumnWidth = 0
or
Me.SubformContainerName.Form!ColumnName.ColumnHidden = True
However, executing the above codes in a Split Form does not seem to work.

Actually, the above codes can also work on a Split Form, but the change is not reflected immediately. The Split Form must be saved, closed, and reopened before the change can be seen. And in my experiments, simply using Me.ColumnWidth or Me.ColumnHidden seems to work inconsistently depending on certain factors. As such, the above approach is not a very good solution.

Another approach for hiding the datasheet columns is by using the following code:
DoCmd.RunCommand acCmdUnhideColumns
The above command will open the dialog window shown in Figure 2.


To hide a column, uncheck the checkbox; and to unhide a column, check the checkbox. The problem with the above solution is that it requires user interaction. If your application needs a functionality to allow the user to select which columns to hide, then this approach will be appropriate for you. But if you don't want the user to have to choose which columns to hide, then you need a solution like the ColumnWidth or ColumnHidden approach above but with the ability to immediately reflect the changes. Luckily, that is still possible using VBA code.

The trick is to approach the problem from a different angle. We know that simply referring to the Split Form using Me.ColumnWidth or Me.ColumnHidden does not always work, but the datasheet object on the Split Form is also accessible through the Screen object. Therefore, to hide a column in a Split Form, all we need to do is execute the following code:
Screen.ActiveDatasheet.ColumnName.ColumnHidden = True
And voila! The above code should allow you to hide any column in the Datasheet View of the Split Form.

Caveat: Please remember that the topic of this article is focused on hiding a column in the datasheet portion of the Split Form. Thus, none of the above code affects the Textbox control on the Single View Form. If you also want to hide the corresponding control on the Single View Form when you hide its matching column in the Datasheet View Form, then you can still use its Visible property. However, hiding controls on the Single View Form will not automatically rearrange the other controls to take its place like it does in the Datasheet Form. If you want the other controls to take the place of the hidden control, that's another story.

Cheers!

Original post date: September 19, 2015

Report Gridlines

I don't normally create reports in my databases because I prefer to export the data into Excel or other format, so that the user can further analyze them. However, I have seen enough questions in the forums regarding "drawing lines" on a report that made me think maybe some people were not aware of this feature.

Gridlines, if I am not mistaken, were added as a feature starting with Access version 2007 (in conjunction with the Layouts). Essentially, it's a new way of drawing border lines around the controls on a report. For example, take a look at Figure 1.


Figure 1 shows a typical setup if the user wanted an Excel or datasheet look for the data displayed on the report. This is typically done by turning on the border for each control. However, if any of the controls has its Can Grow property set to Yes, then we might get the result shown in Figure 2.


Prior to having the Layouts and Gridlines features, most developers resort to using the Line method to draw lines on the report to achieve something similar to what we see in Figure 3. But with Layouts and Gridlines, no code is necessary.


To achieve the effect shown in Figure 3, we just need to select all the controls in the Details section and apply a Layout, Tabular in this case (see Figure 4).


So we're done, right? But wait, the title of this article is about "Gridlines," so what's so good about them? Well, I'm glad you asked. Take a look at Figure 5 to see the difference between how the gridlines are drawn in relation to how the borders are drawn on the report.


As you can see in Figure 5, the gridlines are drawn in between each row (and column, not shown) of data. So how is that better? Well, take a look at Figure 6 where we turned off all the borders and just used gridlines.


Again, the lines shown in Figure 6 were used to be achievable only by using the Line method in previous versions of Access. But now, it is a lot easier to create lines without using code by using the Layouts and Gridlines features.

Now we're done. Hope you find this article informative. All comments are welcome. Thank you!

Original post date: August 6, 2015


Extract Email Address

This topic is really about Regular Expressions. If you do not know, Regular Expressions are text strings used as a search pattern for matching  a group of characters within a larger string. You might think of them as "wildcard" characters. However, they can do more than just match characters in a string because you can embed "rules" within the search pattern that the search engine will use to evaluate a match.

For example, if you use a wildcard character in an Access query, you might use something like this:
WHERE LastName Like "a*"
In this example, the "*" is a wildcard character that tells the database engine to match all records with last names beginning with the letter "a." But what if you wanted to return all records with last names that begin with the letter "a" or the letter "b?" You might use something like this:
WHERE LastName Like "a*" OR LastName Like "b*"
So far, so good. But what if you wanted all records with last names that begin with the letters "a" through "g?" You would have a very long WHERE clause if you continue with the above syntax.

Enter Regular Expressions

So, to help with that kind of situation, Access allows us to use limited forms of regular expressions in queries. For example, to return records with last names that begin with the letters "a" through "g," we can use the following criteria:
WHERE LastName Like "[a-g]*"
Much simpler, right? However, like I said earlier, the Access' database engine only gives us limited regular expression capabilities. To take full advantage of regular expressions, we'll need to use VBA and an external regular expression engine. Fortunately, there is a library that is available to us as a reference called "Microsoft VBScript Regular Expressions x.x"
To show how powerful regular expressions are, the following code example shows how it can be used to extract an email address from a Memo field. I used this example as a response to a question in the MSDN forums. The user wanted a way to extract the email address from a Memo field that contains data similar to the following:
Lastname: Doe
Firstname: John
Email address: john.doe@acme.com
Company: Acme Co.
First, a disclaimer: I don't claim to be an expert in regular expressions. In fact, I rarely use them. I just know that if the situation is right, they can be a very powerful tool to use. I would encourage you to learn more about regular expressons to enhance your applications.
Here's a code example that uses a regular expression object to look for an email address within a string.
Public Function ExtractEmailAddress(strData As String) As String
'http://accessmvp.com/thedbguy
'6/19/2015
'Extracts the first email address within a string
'regex email pattern source: http://www.regular-expressions.info/email.html

Dim regEx As Object
Dim regExMatch As Object

Set regEx = CreateObject("VBScript.RegExp")

With regEx
    .IgnoreCase = True
    .Pattern = "\b[0-9A-Z._%+-]+@[0-9A-Z.-]+.[A-Z]{2,4}\b"
    Set regExMatch = .Execute(strData)
    If regExMatch.Count > 0 Then
        ExtractEmailAddress = regExMatch(0).Value
    Else
        ExtractEmailAddress = "No email found!"
    End If
End With

Set regEx = Nothing
Set regExMatch = Nothing

End Function
Notes: The above code example uses late binding, and it will only return the first email address found, if any. To see a modified version of the above code that returns all email addresses found as a delimited string, please visit my website.

I hope this short article piques your interest into regular expressions, and perhaps, I will be learning a thing or two from you very soon. Thank you for reading.

Original post date: June 28, 2015

Combobox Gremlins

This time, I thought it would be nice to have a little fun for a change. So, in this blog, I will need your participation. I will post a question, and I hope many of you will provide me with "an" answer. It doesn't have to be "the" answer, just tell me what you "think" is the answer. Later on, we can all "vote" on the best one. Are you ready? Let's get started...

To participate in this exercise, you will have to download this file. When you open it, you will see that it contains one table and one form. The form only has one control on it, a combobox. If you click the dropdown for the combobox, you will be presented with several choices. So far so good.

Now, here's the "fun" part... If you go to the form's design view and select the combobox, you can take a look at the Row Source property and see what's in it. Did you see it? So, here's my question. Where are the choices for the combobox dropdown coming from?

Background

This sample database was actually part of something that I inherited recently. I was asked to modify the choices for the combobox and realized something was weird about it. I know where the choices originally came from, but I couldn't figure out how they are showing up in the dropdown. If I change the Row Source from "*" to something like "test," that change is not reflected in form view - I still see the old choices in the dropdown. If I remove the Row Source and change the Row Source Type from Value List to Table/Query, then it behaves normally with the dropdown showing empty. However, as soon as I change the Row Source Type back to Value List, the old dropdown list returns.

What do I think is happening?

Here is my speculation on the issue... You know how Microsoft said that a form can only have so much controls added to it over its lifetime? I was wondering how does it keep track of that number? So, my guess as to what's happening with this form is that the Row Source for the combobox is being tracked somehow and stored somewhere that when you change the Row Source Type back to Value List, the original Row Source returns. However, that doesn't explain why the old Row Source still displays even when I manually change the Row Source property.

What do you think?

I would like to hear your explanation of this issue, because I think it would be nice to learn the truth about something like this. You can either leave a comment below or send me an email.
I have always admitted that I don't know everything about Access, and this is one definite proof of that. But with your help, I hope to learn something new. Thank you for participating!

Original post date: May 28, 2015