Thursday, May 26, 2016

How to Read a Text File

Invariably, at one point or another in your journey to write VBA in Access, there will come a time when you will need to read the contents of a text file into your database. This task may seem challenging at first because it involves an external file, but it doesn't have to be hard.


The OPEN Statement

There are several methods to read a text file into an Access database. VBA has a built-in OPEN statement, which enables input or output access to an external file. Here's an example VBA code to initialize a text file for input:
Open "C:\FolderName\FileName.txt" For Input As #1
The above code creates an object (#1) with a reference to the text file, which then allows its contents to be read in code. For example, the following code reads a line of text from the file into a variable:
Line Input #1, VariableName
After we are done reading its contents, we need to close the connection to the file with the following:
Close #1
Here's an example code snippet to read an entire text file into memory:
Dim intFile As Integer
Dim strFile As String
Dim strText As String
Dim strInput As String

intFile = FreeFile()

strFile = "C:\FolderName\FileName.txt"

Open strFile For Input As #intFile

Do While Not EOF(#intFile)
     Line Input #intfile, strInput
     strText = strText & strInput
Loop

Close #intFile
Please notice the use of the FreeFile() function to retrieve the next available file number rather than assigning a specific file number with the OPEN statement. It avoids possible mistakes of referring to the wrong file in case you are trying to manipulate multiple files at the same time.


The File System Object

My preferred method to read a text file into Access is to use FSO (File System Object). It adds an external reference (overhead) to the application, but I think the process will run a bit faster, and the code will also be a bit cleaner.


For instance, compare the following function, using FSO, to the one above, using the OPEN statement:
Public Function ReadTextFile(strFile As String) As String
'3/10/2016
'http://accessmvp.com/thedbguy

Dim fso As Object
Dim objFile As Object

Set fso = CreateObject("Scripting.FileSystemObject")

If fso.FileExists(strFile) Then
     Set objFile = fso.OpenTextFile(strFile, 1) '1=ForReading, 8=ForAppending
     ReadTextFile = objFile.ReadAll
End If

Set objFile = Nothing
Set fso = Nothing

End Function
The above function uses "late binding," so a reference to the File System Object is not necessary. However, you can use "early binding" if you prefer.


I hope you find the above methods useful. Please do not hesitate to let me know which method you prefer and why (or why not the other). Cheers!


Thursday, April 21, 2016

Retrieve Greenwich Mean Time (GMT)

I recently had a need to retrieve the current date and time from the Internet to prevent the user from merely changing the system clock to circumvent a security check I was performing.

Turns out, I don't even need a specific web service to provide the current date and time from a web server. Most web servers already include this information when it returns a page requested by a client. All we need to do is examine the response header.

One thing to note is the date and time provided by the web server is set to Greenwich Mean Time (GMT). If you need to know the "local" time, you will have to perform additional manipulation of the result using time zone information.

The following code simply retrieves the GMT from this blog site. If you were able to add any enhancements to this code, I would really love to hear about it. Hope you find it useful.

Public Function GetGMT() As Variant
'4/20/2016
'http://accessmvp.com/thedbguy
'Retrieves the Greenwich Mean Time (GMT) from theDBguy's blog server

On Error GoTo errHandler

Dim objHTTP As Object
Dim strURL As String
Dim strGMT As String

strURL = "http://thedbguy.blogspot.com"

Set objHTTP = CreateObject("Microsoft.XMLHTTP")

With objHTTP
    .Open "GET", strURL, False
    .Send
    strGMT = .getResponseHeader("Date")

End With

If strGMT <> "" Then
    strGMT = Mid(strGMT, 6, 20)
    If IsDate(strGMT) Then
        GetGMT = CDate(strGMT)
    Else
        GetGMT = Null
    End If
End If

errExit:
    Set objHTTP = Nothing
    Exit Function
    
errHandler:
    MsgBox Err.Number & ": " & Err.Description
    Resume errExit
    Resume
    
End Function


Friday, March 18, 2016

Extract Data Using Regular Expressions


Earlier, I wrote this article for extracting e-mail addresses from a memo field using regular expressions. What it was able to do is return all strings matching a particular pattern. Recently, I had a request to enhance the code to return all strings "inside" a particular pattern. See the discussion thread at UtterAccess. As a result, the following modified function takes a pattern and uses the Replace method to return only the string inside the "boundary" identified within the pattern.
Public Function ExtractData(strData As String, _
    Optional strDelim As String = ";") As String
'http://accessmvp.com/thedbguy
'2/9/2016
'Extracts data using regular expressions

Dim regEx As Object
Dim regExMatch As Object
Dim var As Variant
Dim strMatches As String

Set regEx = CreateObject("VBScript.RegExp")

With regEx
    .Global = True
    .IgnoreCase = True
    .Pattern = "\[(\w+)\]"
    Set regExMatch = .Execute(strData)
    For Each var In regExMatch
        strMatches = strMatches & strDelim & .Replace(var, "$1")
    Next
End With

ExtractData = Mid(strMatches, Len(strDelim) + 1)

Set regEx = Nothing
Set regExMatch = Nothing

End Function
To use the above function, make sure to replace the "pattern" identifying the boundaries and the string pattern you're trying to extract. For example, as discussed in the UtterAccess thread, the above function looks for a single word inside a pair of square brackets. You can also use the above function to extract the body of an HTML page by using the following pattern: "<body>(.+[\s\S]+)</body>".

I hope you find the above function useful. As usual, all feedback are welcome. Thank you!

Thursday, February 25, 2016

Normalization

This month, I decided to go back to basics. I know there are already plenty of articles regarding this subject. But since I am about to give a lecture about this topic to a small group of people this week, I thought I might as well post it here, so I can use it as a quick reference in the future.

What is Normalization?

Normalization is the process of designing a database table structure that organizes the data to minimize data redundancy and facilitate data integrity. The main objective of "normalizing" the data is to isolate the information so modifications to the data can be performed in just one table and then propagate throughout the database by means of related foreign keys.
There are defined "rules" to follow when going through the normalization process. When a database is properly normalized, it is considered to be in "normal form." For example, a database complying with the first rule is said to be in "First Normal Form (1NF)." Although there are several levels or rules for normalizing a database, most developers will attempt to comply only up to the "Third Normal Form (3NF)." 3NF is considered to be the highest level necessary for most database applications in use today.

First Normal Form (1NF)

A database must comply with the following rules to be considered 1NF:
  1. Eliminate repeating groups in individual tables
  2. Create a separate table for each set of related data
  3. Identify each set of related data with a primary key

Example: The following table violates 1NF.


Second Normal Form (2NF)

A database must comply with the following rules to be considered 2NF:
  1. All the rules for 1NF
  2. Create separate tables for sets of values that apply to multiple records (duplicates)
  3. Relate these tables with a foreign key

Example: The following table is in 1NF but violates 2NF:


Third Normal Form (3NF)

A database must comply with the following rules to be considered 3NF:
  1. All the rules for 1NF and 2NF
  2. Eliminate fields that do not depend on the key

Example: The following table is in 2NF but violates 3NF:


How can I remember all that?

Here are the main ideas to help you remember each normal form:
  1. 1NF - Eliminate repeating groups (e.g. Price1, Price2, Price3)
  2. 2NF - Eliminate duplicate or redundant data (e.g. multiple records with same values)
  3. 3NF - Ensure all fields in the table are dependent on the primary key (e.g. city is dependent on the venue and not on the artist)

How do I fix this table structure?

The following tables show a properly normalized structure:


If you can think of a better example, please let me know. Thank you.

Original post date: January 26, 2016

Hide Datasheet Columns in Split Forms

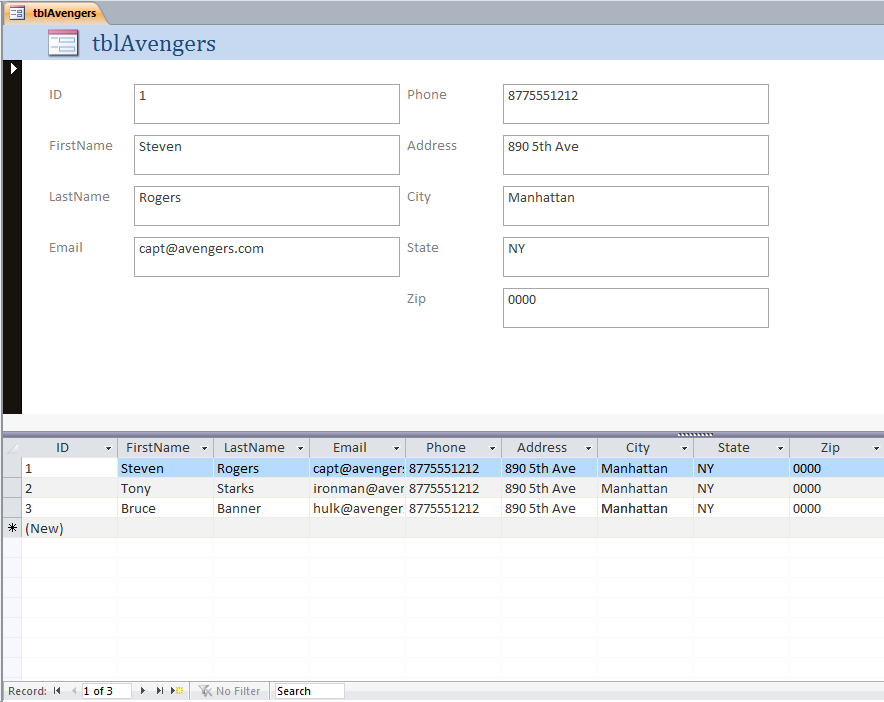
I have heard many complaints about using a Split Form since its introduction in Access 2007. The main purpose of a Split Form is to display the current record in a Single Form View while also displaying the form's record source in a Datasheet View. As the user navigates the records on the form, both the single and datasheet forms will reflect the current record. Figure 1 shows an example of a typical Split Form.


The biggest complaint I've heard about Split Forms is the apparent inability to hide the datasheet columns using VBA.
Before Split Forms, developers had to use a subform in datasheet view and executing either of the following code will easily hide a datasheet column:
Me.SubformContainerName.Form!ColumnName.ColumnWidth = 0
or
Me.SubformContainerName.Form!ColumnName.ColumnHidden = True
However, executing the above codes in a Split Form does not seem to work.

Actually, the above codes can also work on a Split Form, but the change is not reflected immediately. The Split Form must be saved, closed, and reopened before the change can be seen. And in my experiments, simply using Me.ColumnWidth or Me.ColumnHidden seems to work inconsistently depending on certain factors. As such, the above approach is not a very good solution.

Another approach for hiding the datasheet columns is by using the following code:
DoCmd.RunCommand acCmdUnhideColumns
The above command will open the dialog window shown in Figure 2.


To hide a column, uncheck the checkbox; and to unhide a column, check the checkbox. The problem with the above solution is that it requires user interaction. If your application needs a functionality to allow the user to select which columns to hide, then this approach will be appropriate for you. But if you don't want the user to have to choose which columns to hide, then you need a solution like the ColumnWidth or ColumnHidden approach above but with the ability to immediately reflect the changes. Luckily, that is still possible using VBA code.

The trick is to approach the problem from a different angle. We know that simply referring to the Split Form using Me.ColumnWidth or Me.ColumnHidden does not always work, but the datasheet object on the Split Form is also accessible through the Screen object. Therefore, to hide a column in a Split Form, all we need to do is execute the following code:
Screen.ActiveDatasheet.ColumnName.ColumnHidden = True
And voila! The above code should allow you to hide any column in the Datasheet View of the Split Form.

Caveat: Please remember that the topic of this article is focused on hiding a column in the datasheet portion of the Split Form. Thus, none of the above code affects the Textbox control on the Single View Form. If you also want to hide the corresponding control on the Single View Form when you hide its matching column in the Datasheet View Form, then you can still use its Visible property. However, hiding controls on the Single View Form will not automatically rearrange the other controls to take its place like it does in the Datasheet Form. If you want the other controls to take the place of the hidden control, that's another story.

Cheers!

Original post date: September 19, 2015